Everything You Need To Know About OrderUp’s Digital Menu Builder
Posted on |
How to use the OrderUp Menu Builder Application
*This tutorial and post is slightly out of date as of June 2023. Please reach out to [email protected] if you have any questions about our menu builder. It’s much more complex (in a good way) as of now.
Welcome to the OrderUp Menu Builder Tutorial. In the article we’ll go over the basics of OrderUp’s Free Digital Menu Builder.
We’ll continue to update this post to reflect new product features.
Using an OrderUp digital menu allows you to create beautiful, mobile friendly digital menus that will delight your diners and help you save on printing costs, cleaning costs and the extra time it takes for your staff to drop, collect and sanitize traditional menus. If you’re looking to have your menu digitized for free contact us.
This post is based off of the video below, “OrderUp Menu Builder Tutorial”. It’s timestamped on YouTube so we do recommend checking out that video first.
NOTE: We have since added a number of features to the menu builder! Please check the list below to see if we have an answer to your question. If not, please email [email protected]
Use the menu below to navigate to specific sections.
If you’re unable to find what you’re looking for or are having trouble making menu changes, feel free to contact [email protected] for more personalized assistance.
We’ve broken it up into 5 sections: Menu, Categories, Items, and Modifiers & Merchant Settings (NEW)
- Menu
- Categories
- Name or Rename a Category
- Add or Edit Category Descriptions
- Change The Order Of Categories (where they appear)in a Menu NEW**
- Select Which Menus a Category Appears Under
- Category Expand/Contract
- Adding Items to a Category
- Remove Items From a Category
- Edit an Item (From Category)
- Create a New Category
- Delete a Category
- Items
- Modifiers
- Merchant Settings
OrderUp Digital Menus
On the left-hand side, we’re broadcasting an iPhone and on the right-hand side, this is the Menu Builder application that we provide for free to all restaurants. We’re viewing it from a computer, but you can use it on any tablet or any device that has a modern web browser. On the Menu Builder we’ve broken up the building process into categories or groupings. So we can see on the top bar we have our Menu’s, Categories, Items and Modifiers. In this section, we’ll be focusing on the “Menu” Tab and making changes within it.
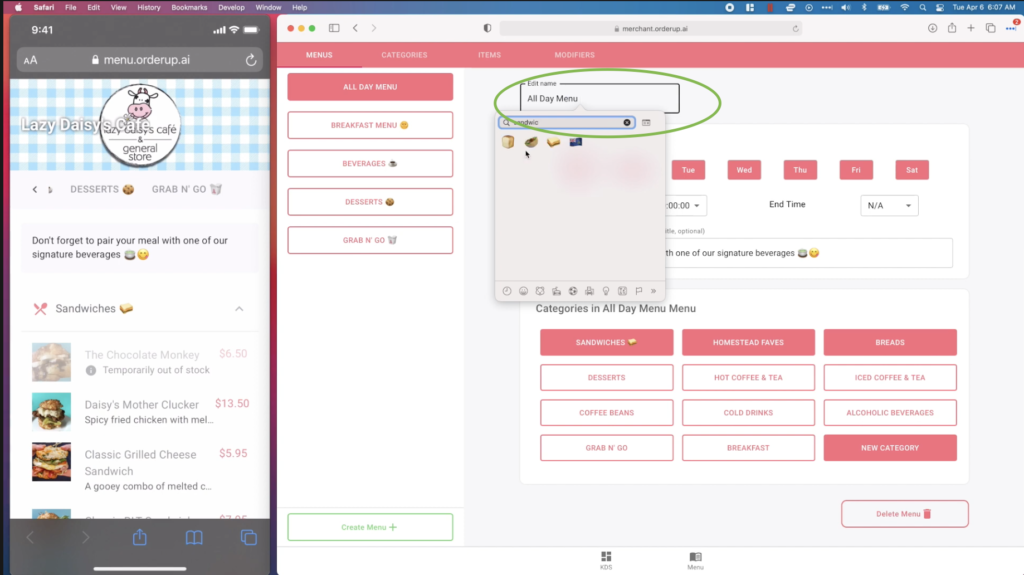
How to Change a Menu’s Name
To change a menu’s name – simply open the menu in the Menu Builder, on the right, you’ll see the Menu setting. Simply click the Menu Name (above menu settings), and update the name. (See Below). P.S – Emoji’s are welcome!
- Click the Menu tab at the top left of the menu builder
- Click into the Menu on the left in which you want to make the change
- Click on the Menu Name itself (above menu settings)
- Change the text
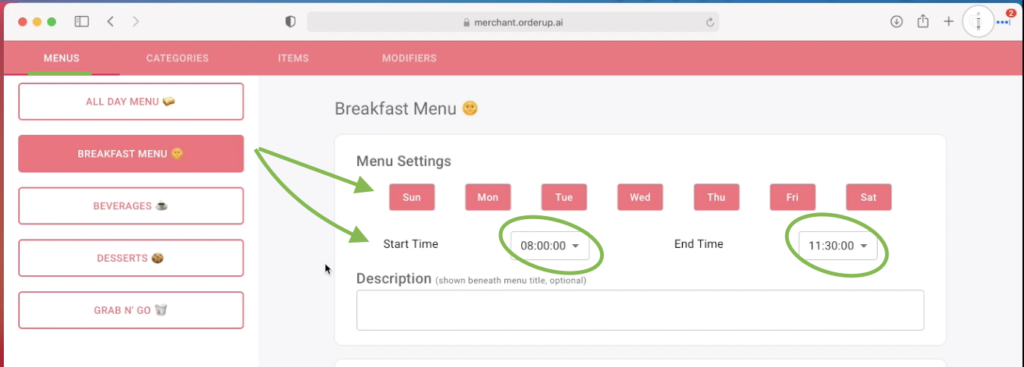
Select Time & Days Menus are Available
This feature is super useful, as it allows you to have multiple digital menus, for different types of service. Popular use cases are Brunch, Happy Hour, Dinner, Breakfast and so on. The menus are designed to remain visible so guests dining at different times are enticed to come back to try a different menu. To update the specific times for your Menu:
- Click the Menu tab at the top left of the menu builder
- Click into the Menu on the left that you want to select a specific time for
- Toggle between days and times.
Multiple Time Slots Per Day For a Menu
With this new update, merchants are able to display menu’s for more than one time slot, on any given day. The flipside of this, is that you can have the same menu, appearing for different time slots, on the same or different days.
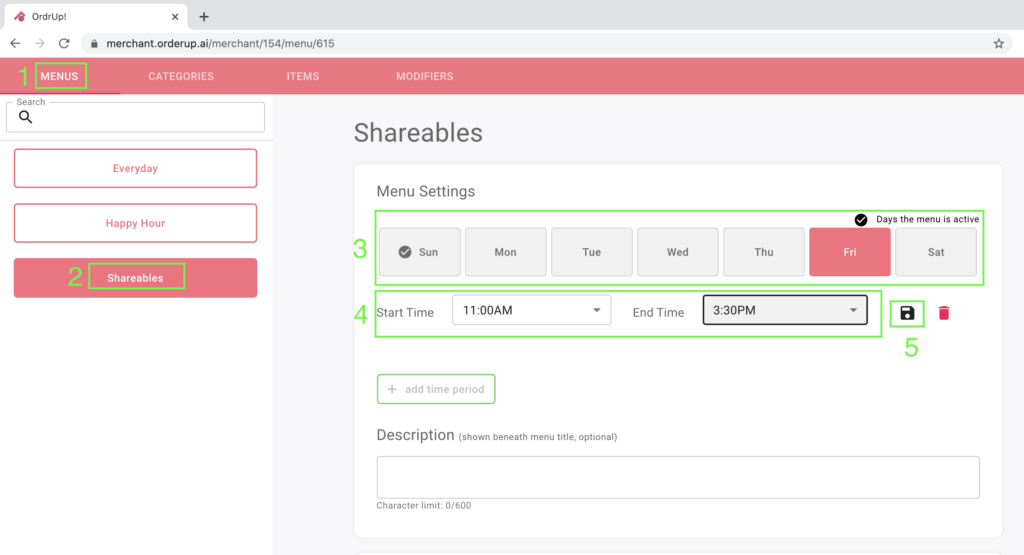
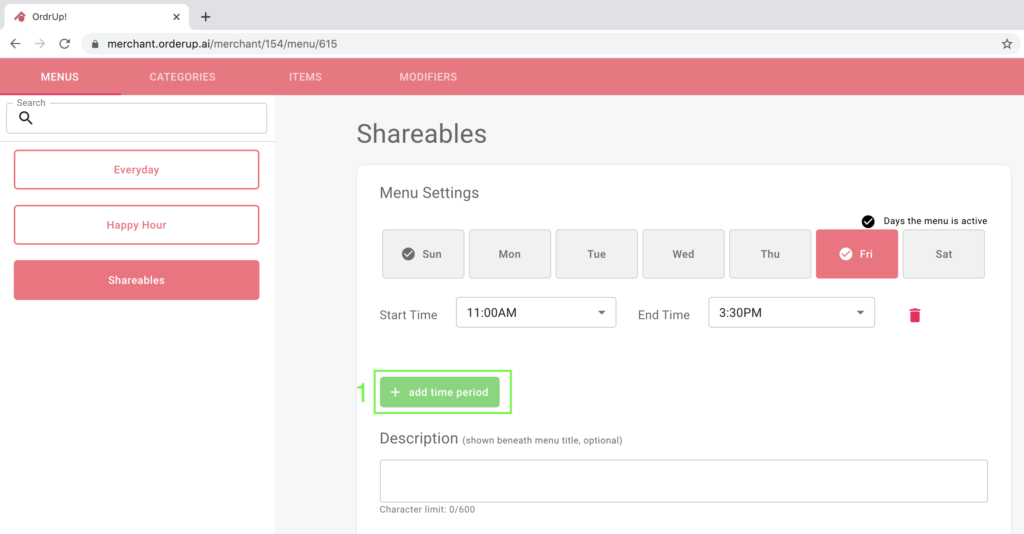
Take the example below, for the menu “Shareables”. This menu is meant for A) Lunchtime and B) Late-Night eats. Here’s how to set up the “lunctime” timeframe:
Log into your menu builder
- Click the Menu Tab at the top left
- Choose which menu you’d like to edit, in this case, we’re using “Shareables”
- Choose the day(s) that you want the menu to be available for
- Adjust the Start and End times to reflect the “first” time you want that menu visible
- Click Save
So we already have our “Shareables” Menu available form 11:00am – 3:30pm, but we also want it to appear later in that evening.
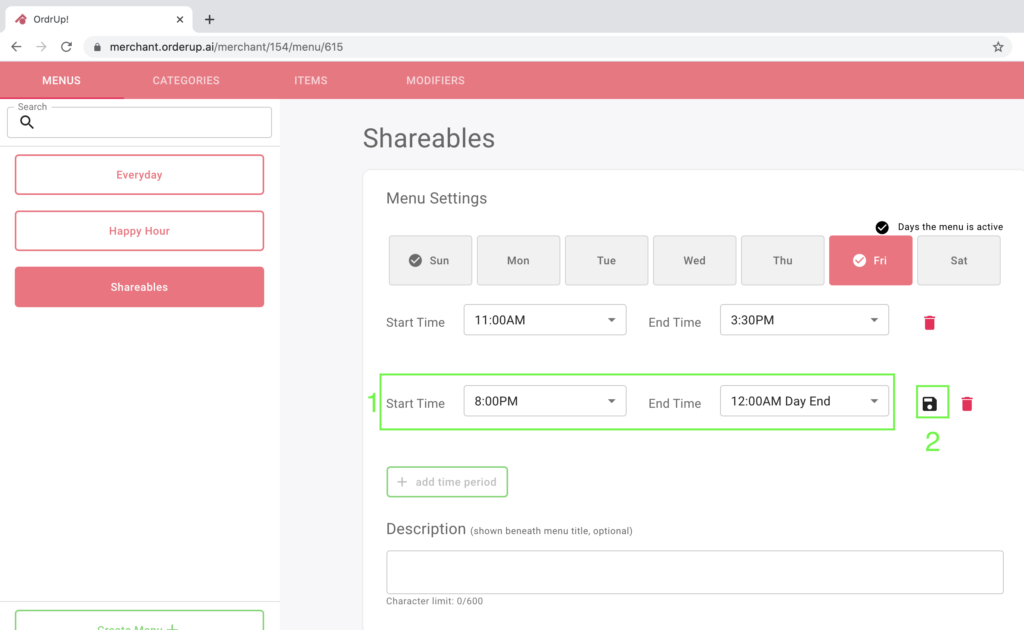
Sign into your menu builder application, click the menu which you wish to add a time slot to.
- Click the “+Add Time Period” button below the initial or first time.
Set the next time you’d like the menu to appear. In this case, we want “Shareables” to also appear from 8:00pm to 12:00am (closing).
Note, this can be done multiple times, throughout multiple days.
- Select second time frame
- Click save
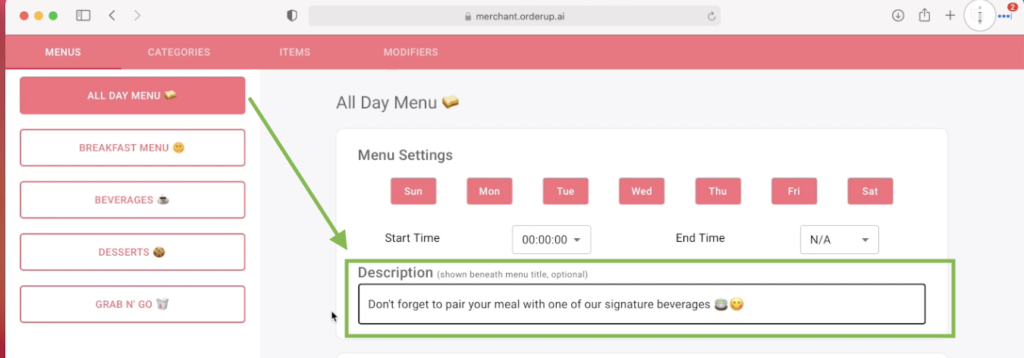
Add or Edit Menu Description
Menu descriptions are an awesome way to describe what that menu is all about, but also serves as an area for valuable information, or creativity and brand voice. There is also SEO (Search Engine Optimization) value in these description boxes. [Learn more about menu optimization here]. There’s also an opportunity for menu optimization, and testing different descriptions, names or items.
We recommend you stick to what your “voice” is in how you would describe the menu and the items and categories within it. Each menu gets 1 description. Take below, for example, the Description for the “All Day Menu”.
Simply fill out the text box with your own messaging.
- Click the Menu tab at the top left of the menu builder
- Click into the Menu on the left that you want to add or edit the description of
- Type your text in the description box
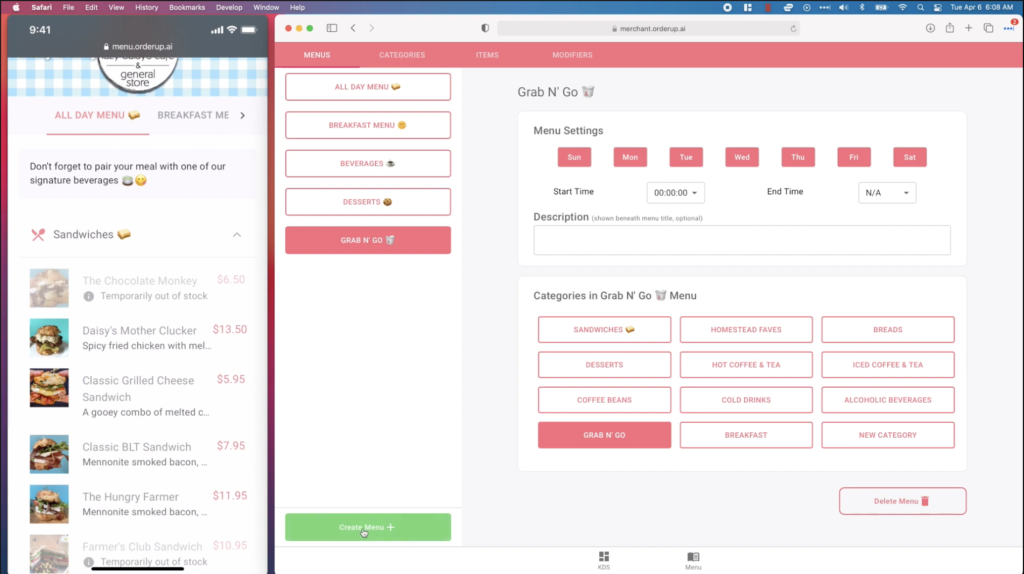
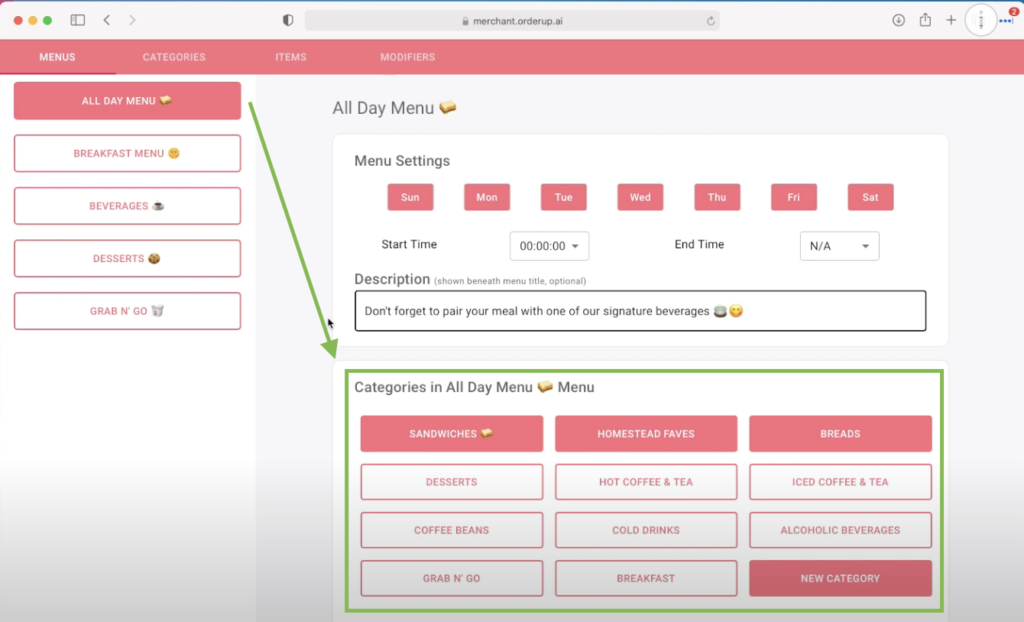
Select Which Categories Appear Under a Menu
In order to segment your menu, you’ll want to create categories of food or drink items. You have complete control over how these are created, and which items and modifiers can belong within a category. To associate, add or remove a category from a menu, follow these steps:
- Click the Menu tab at the top left of the menu builder
- Click into the Menu on the left that you want update it’s categories
- Pick the Categories (highlighted) that you want to appear under the Menu
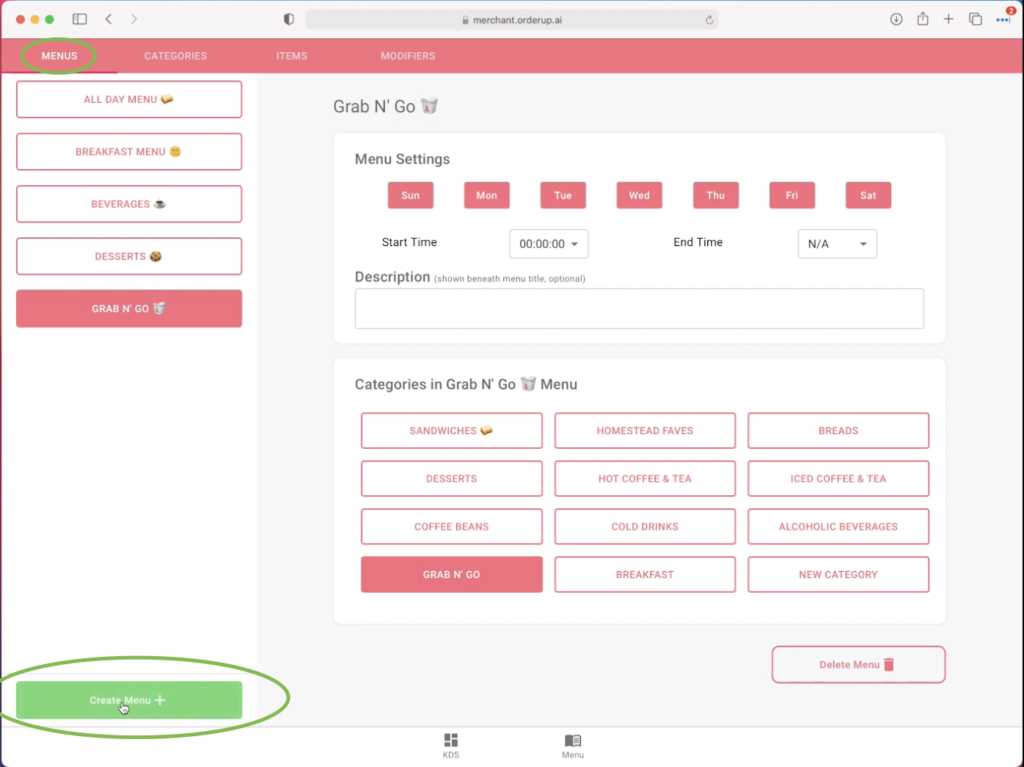
Create a New Menu
Your restaurant can create as many digital menus as you’d like! And it’s super easy – here’s how:
- Click the Menu tab at the top left of the menu builder
- At the bottom left hand side, click the green button that says “Create Menu+”
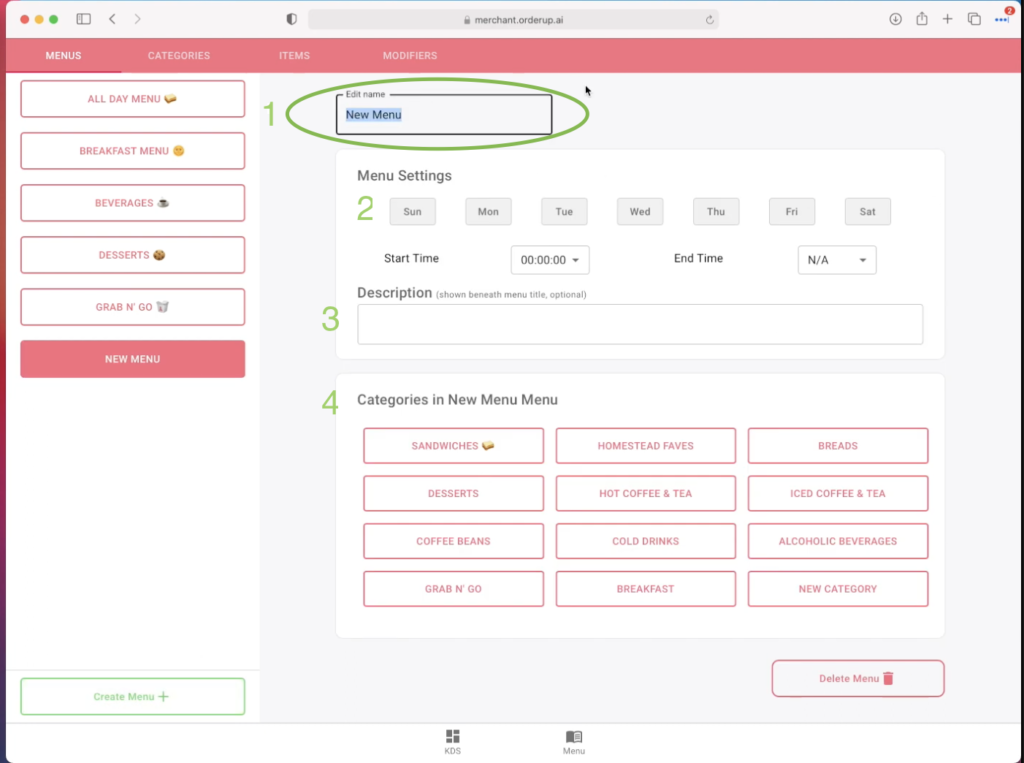
Once created, you should see a page that looks like this (below):
- Enter the Menu Name
- Choose which times and days it should be available
- Add in a menu description
- Choose which categories should appear under that menu
Delete a Menu
Deleting a menu is also very simple, and similar to creating one. To delete a menu:
- Click the Menu tab at the top left of the menu builder
- Click on the Menu on the Left that you wish to delete
- Scroll to the bottom of the screen
- Click the red “Delete Menu” button at the bottom right
- Click “Delete Menu” in the popup
Categories
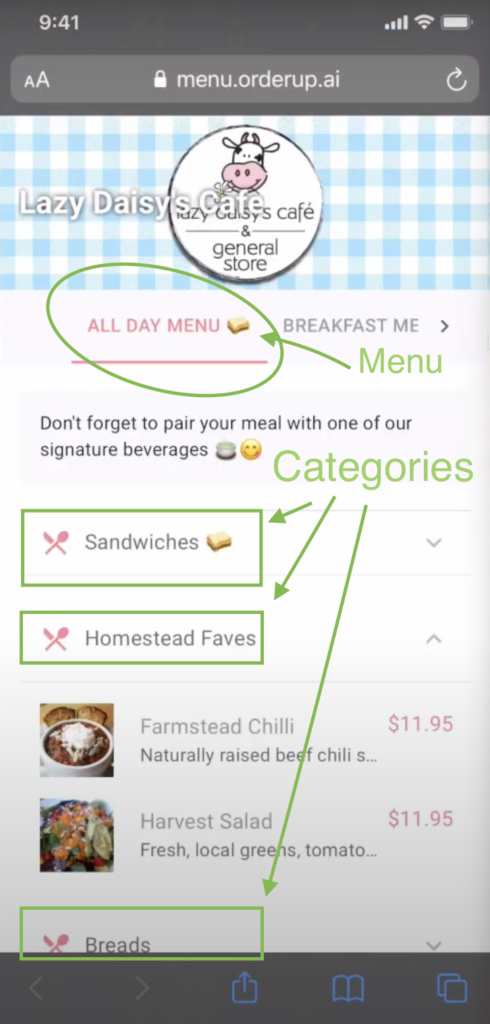
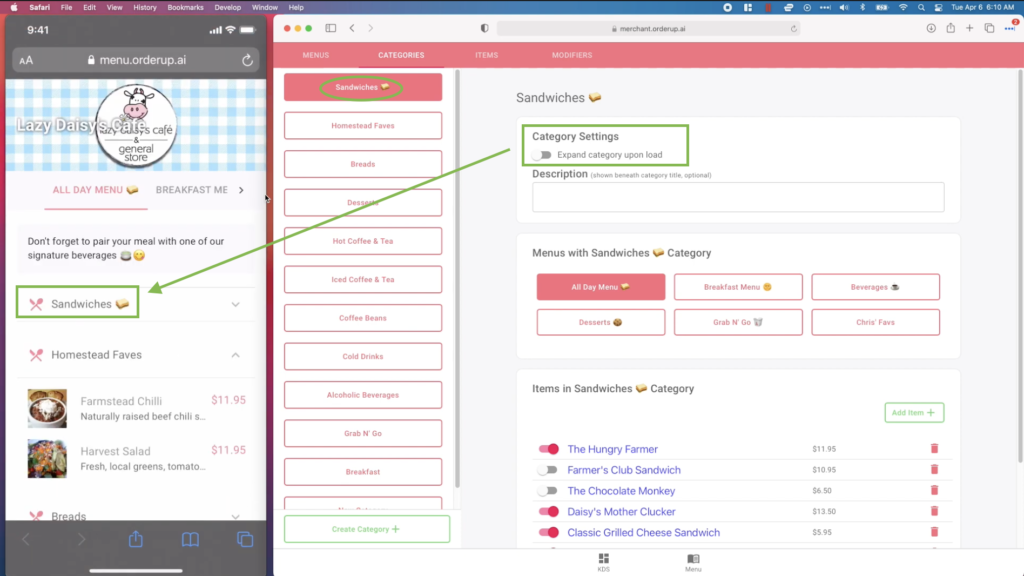
Categories are where you host groups of items that appear under a menu. You can add, remove, or edit items in a category, and your categories can live under as many menus as you’d like. This is what categories look like on your guest’s digital menu.
In this case, the Menu is “All Day Breakfast”.
And the Categories under that menu are
- Sandwiches 🥪
- Homestead Faves
- Breads
In this section we’ll go over everything you need to. know about creating, editing or updating Categories from your OrderUp Menu Builder.
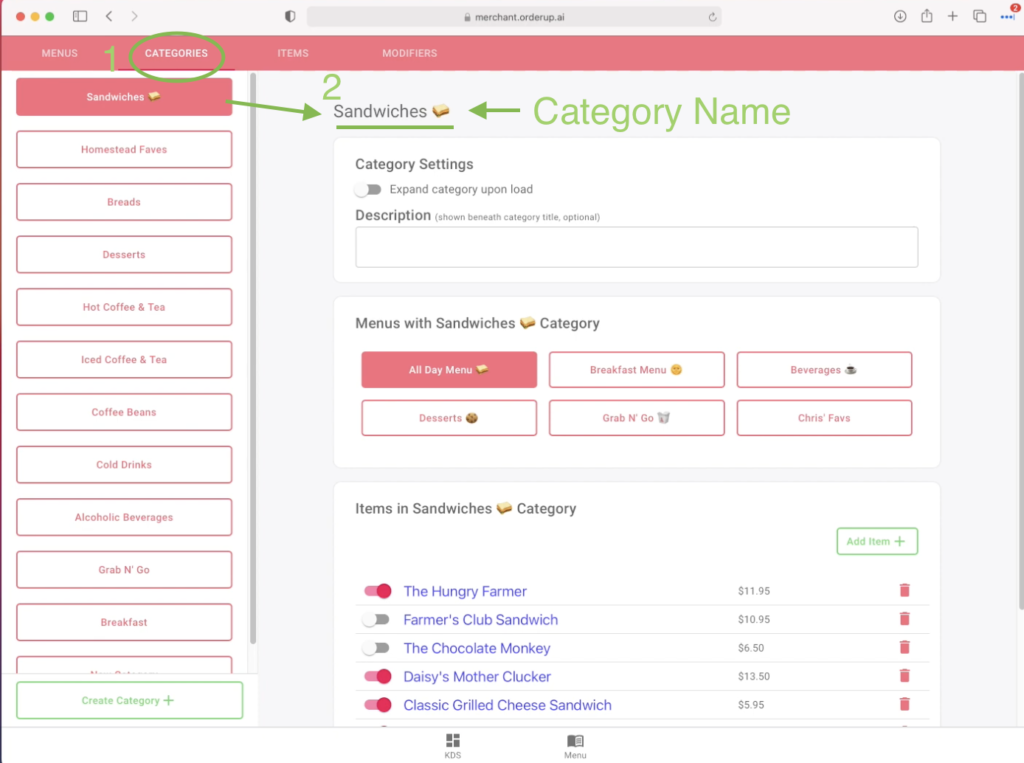
Name or Rename a Category
Changing the name of a category is simple. Here’s how
- Click on the “Category” tab at the top of the Menu Builder
- Find the Category you wish to edit on the left hand side, click it
- Click the existing Category Name to edit
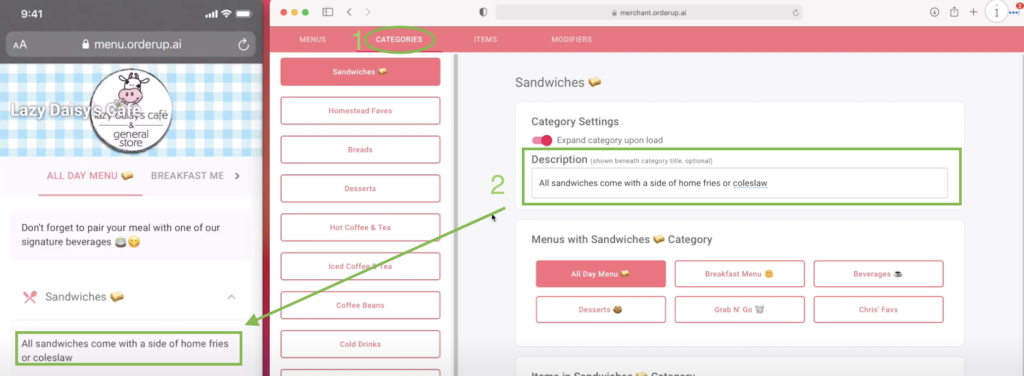
Add or Edit Category Descriptions
Headers and descriptions are meant to guide your diner and provide them with extra information about the food category. You can get creative with your descriptions, or simply state the sides, combo’s, and so on. To add or update a category description:
- Click on the “Category” tab at the top of the Menu Builder
- Find the Category on the left-hand side which you want to edit
- Fill out the “Description” Text box in the “Category Settings” Box
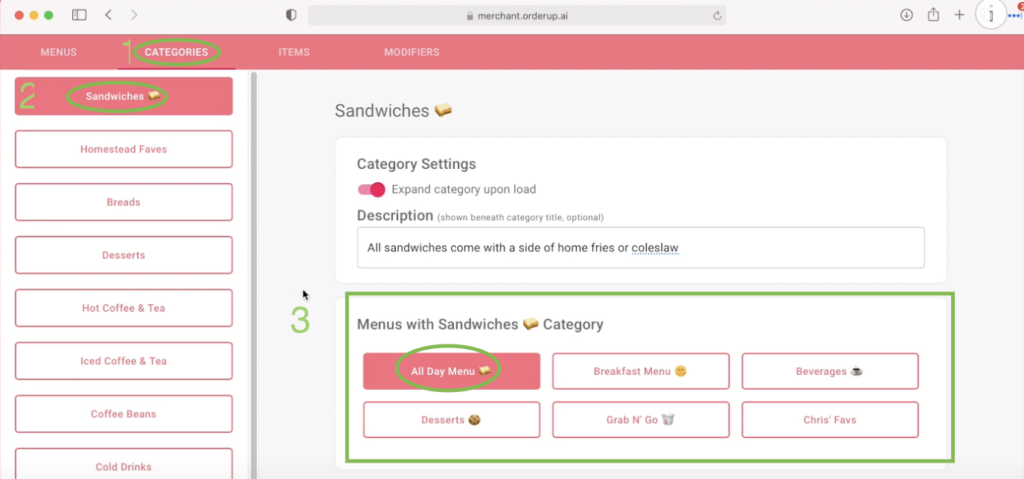
To make your categories appear under a certain menu, just click the menu(s) listed in the box below the “Category Settings”. You can associate as many as you’d like.
- Navigate to the Category Tab at the top left of the Menu Builder
- Select which category you’d like to associate or add to a menu.
- Select the menu in the “Menu’s with *Category Name* box”
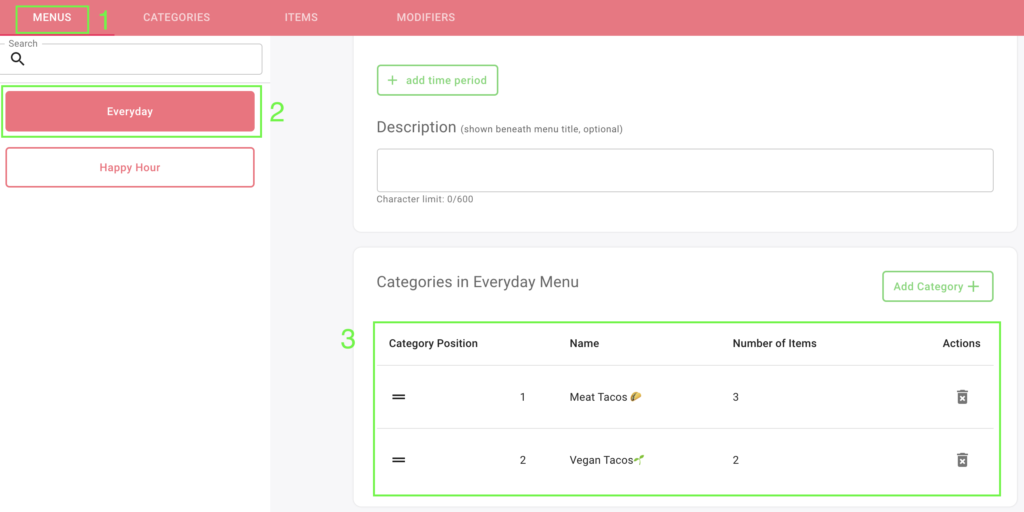
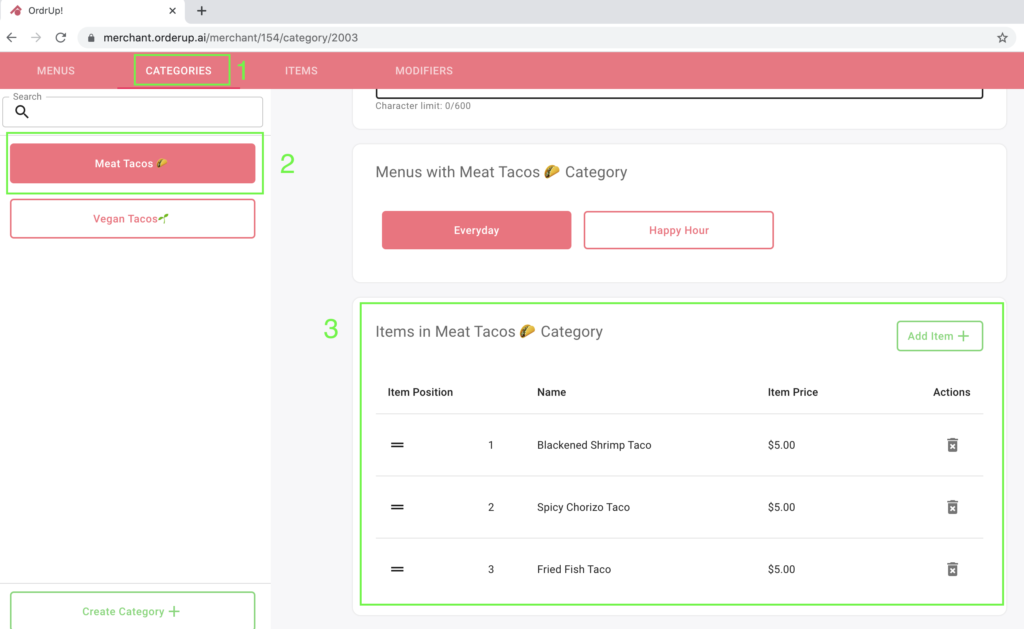
Change the Order of Categories Within a Menu
How to change the order of Categories within a Menu:
Log into your Menu Builder Application
- Click on the Menu Tab at the top left
- Click the Menu in which you want to adjust the order of the categories
- Scroll down, and you will see the number of which the categories appear
Drag and drop the categories to the desired position (order)
In this case, “Meat Tacos” would appear first, and “Vegan Tacos” would appear second.
Category Expand/Contract
By turning ON (red switch) Category Expand, when users open the menu, the category will already be open and the items visible to scroll through. See below.
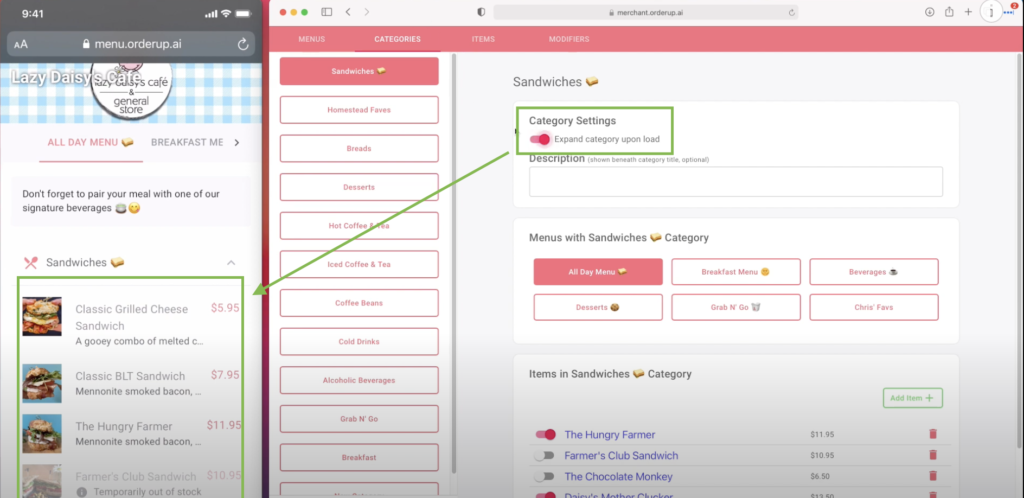
Conversely, if you have a large menu with multiple categories and items, it may be useful to the user experience (UX) to Contract the category (no red switch). This is entirely up to you, and what you believe the best option is. See the difference below.
Adding Items to a Category
You can add or remove items from any category in real-time. Here’s how:
- Navigate to the Category Tab at the top left of the Menu Builder
- Select the category in which you want to add the item to
- In the “Items in *Category Name* Section, click “Add Item +” towards the top right of the box
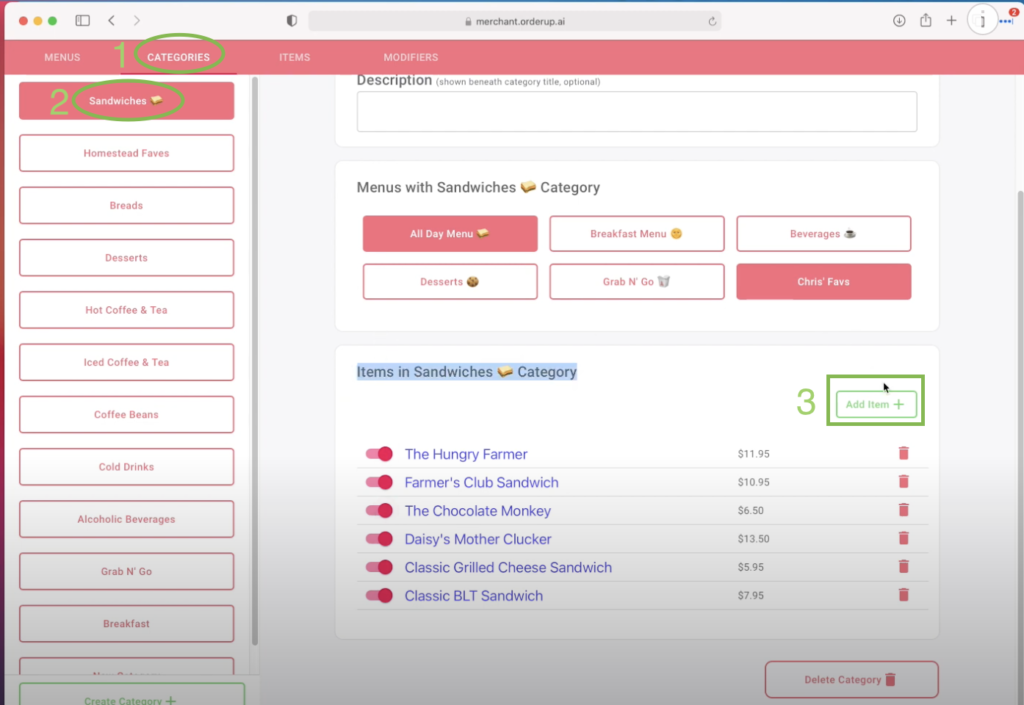
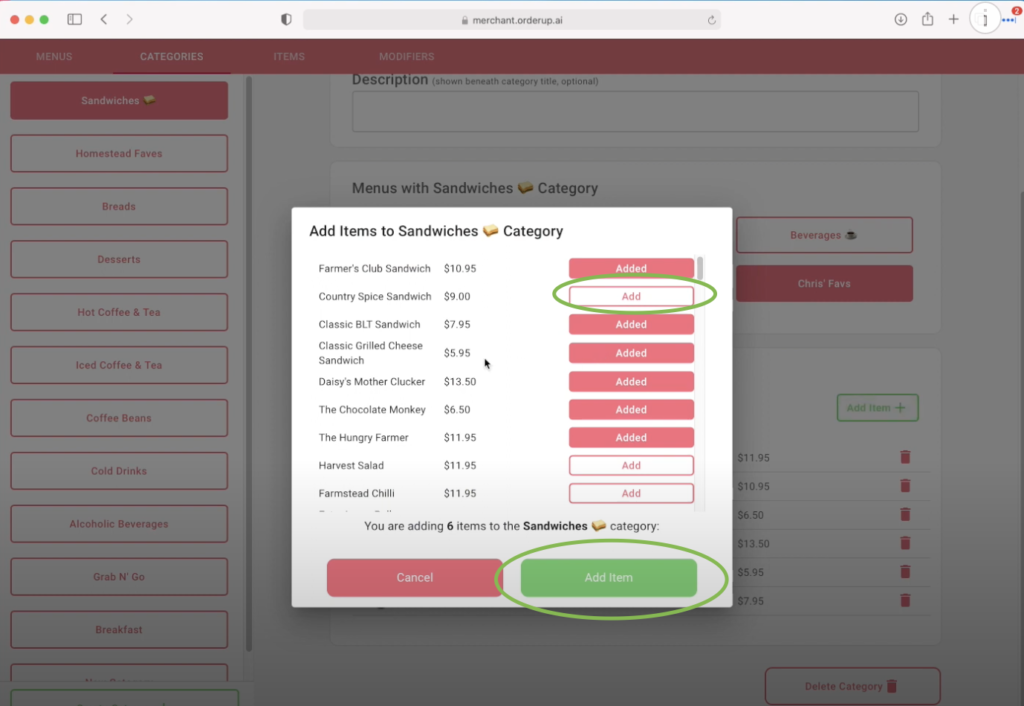
- A screen should pop up, displaying all available items
- Click “Add” next to the desired item.
- Then click the green “Add Item” button at the bottom (See below)
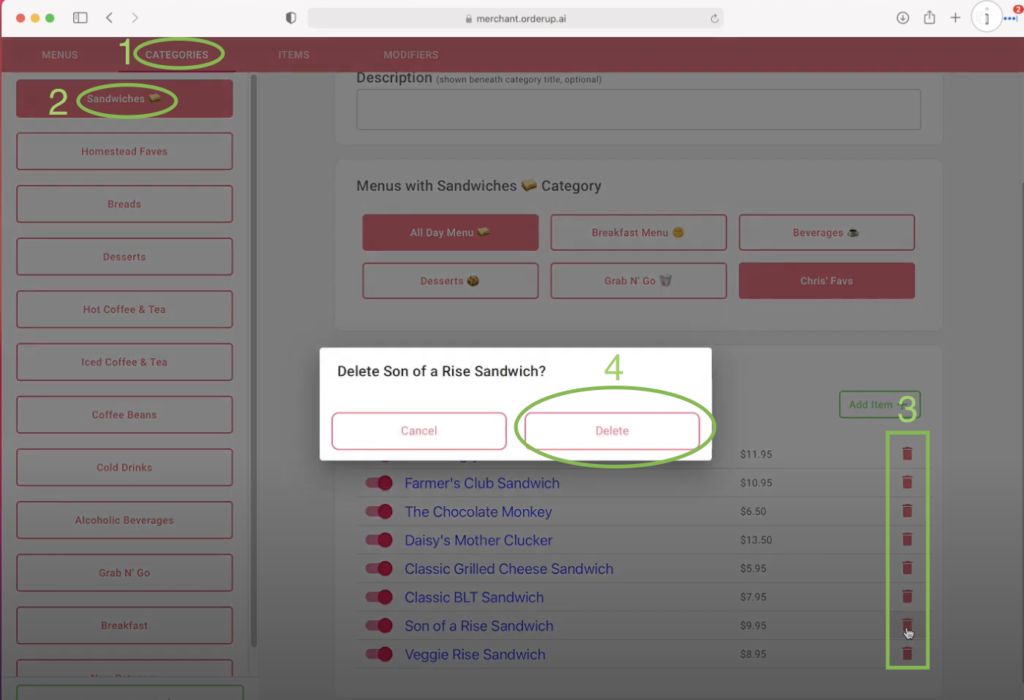
Remove Items From a Category
Similarly, if you’d like to remove an item from a category, you can deselect “Added” (red) and then click the “Add Items” button to confirm that you are removing it. You can also remove items directly from the category page. When you do this, you are not deleting the item, just removing it from the category.
- Navigate to the Category Tab at the top left of the Menu Builder
- Select the category in which you want to remove the item from
- In the “Items in *Category Name* Section, click the garbage can to the right of the item
- Click delete on the popup
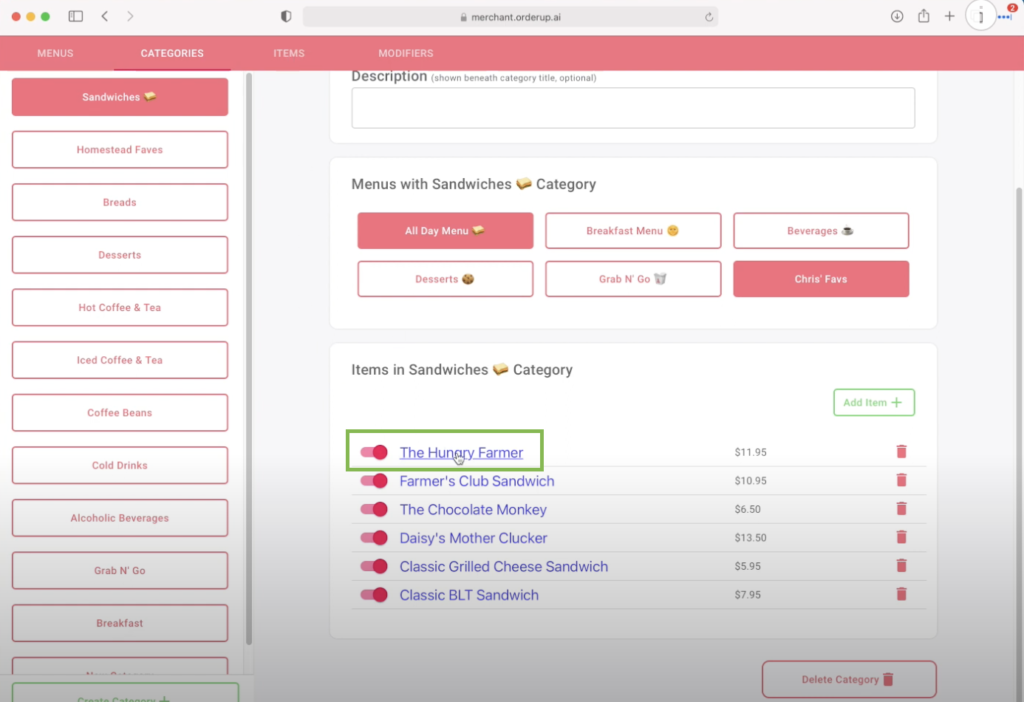
Edit an Item (From Category)
To quickly edit items from the Category page, simply click the item. It will take you to the item page for that specific item. You can also edit an item from the Item tab (which is covered here).
- Click on the “Category” tab at the top of the Menu Builder
- Find the category which you’d like to edit
- Click on the item to make any changes or edits
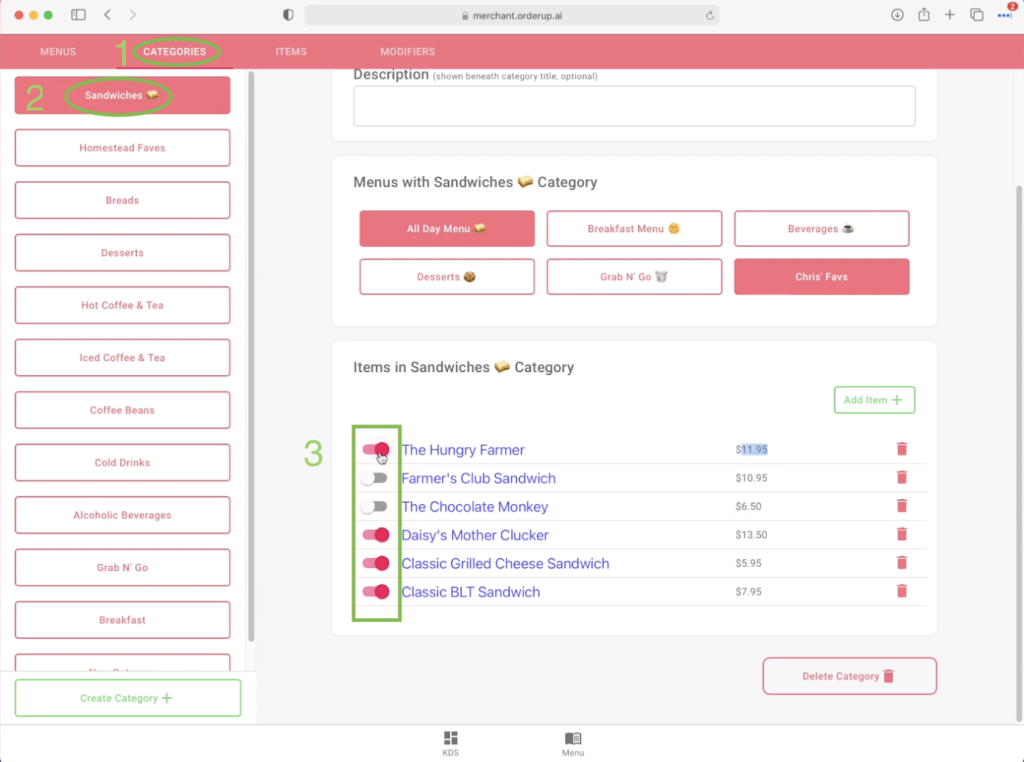
Mark Item Out of Stock (From Category)
Out of stock for a specific item? No problem! Don’t worry about removing it from your category or menu, simply 86 it with the click of a button. Here’s how:
- Navigate to the Category Tab at the top left of the Menu Builder
- Select the category in which the item is associated with, scroll to the bottom section of the menu builder labeled “Items in *Category Name*
- Toggle the switch to the left of the item. Red means it is in stock, grey means it is out of stock.
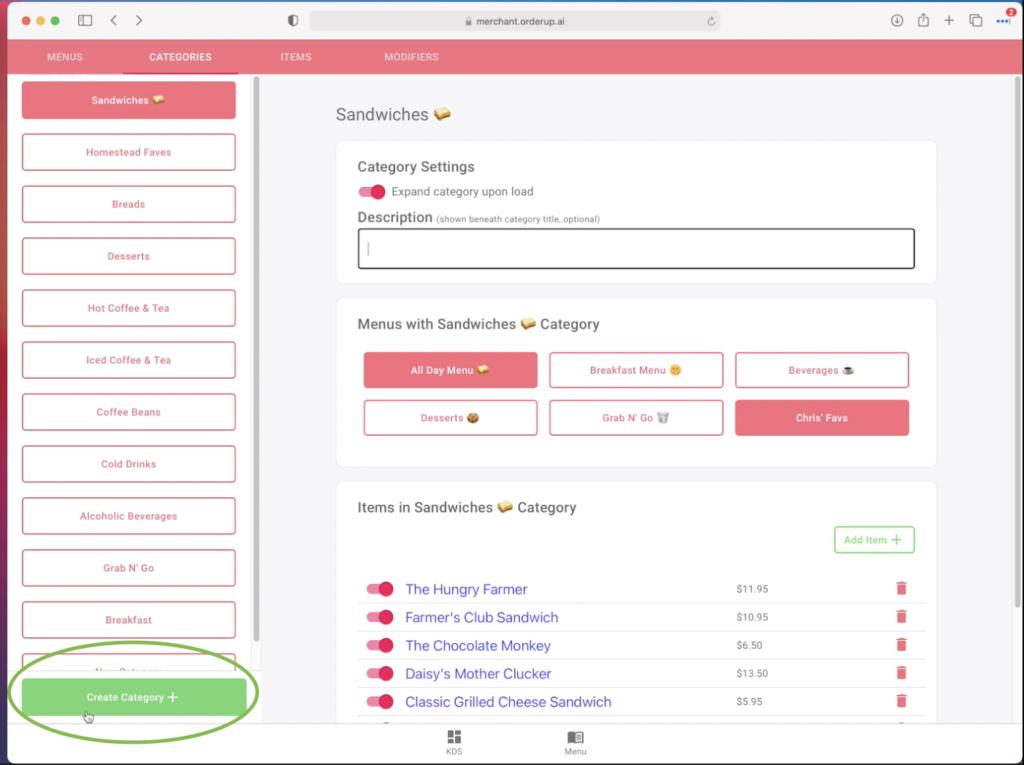
Create a New Category
You can have as many or as few categories as you’d like. To Create a new Category:
- Navigate to the Category tab in the Menu Builder
- Click “Create Category” at the bottom left of the page
- Fill in the New Category details
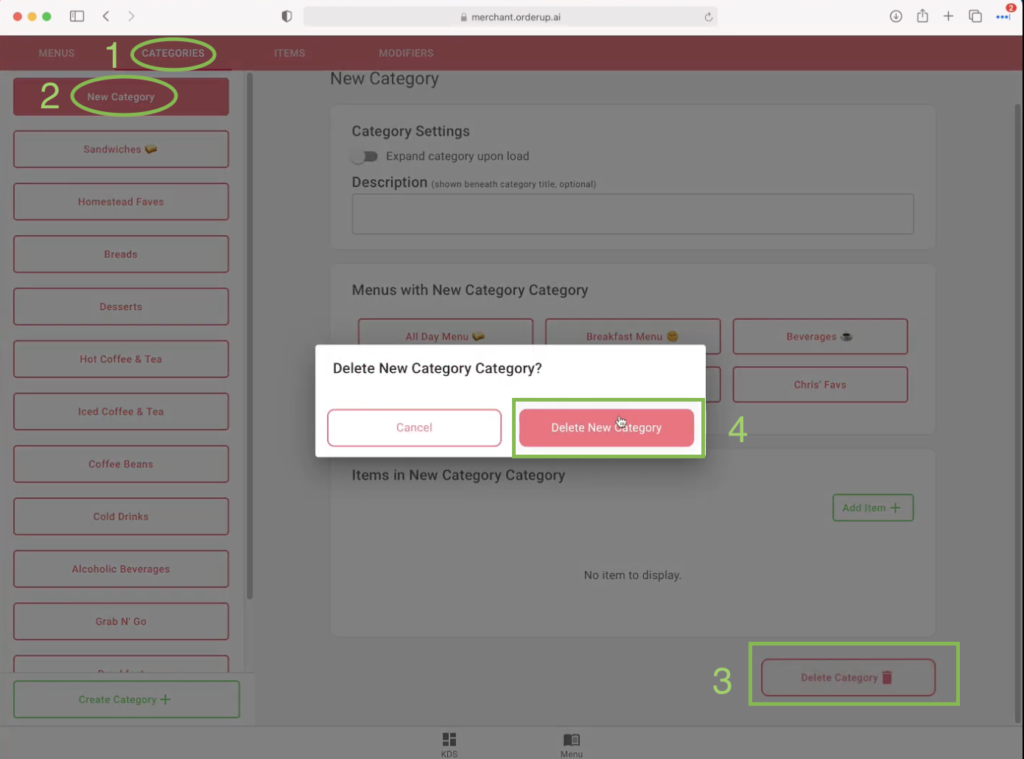
Delete a Category
If you’d like to delete a category, simply click the “Delete Category” button in the bottom right corner on the Categories Page.
- Navigate to the Category Page in the Menu Builder
- Select which category you’d like to delete
- Click the “Delete Category” button at the bottom right of the page
- Confirm by clicking “Delete Category” in the popup
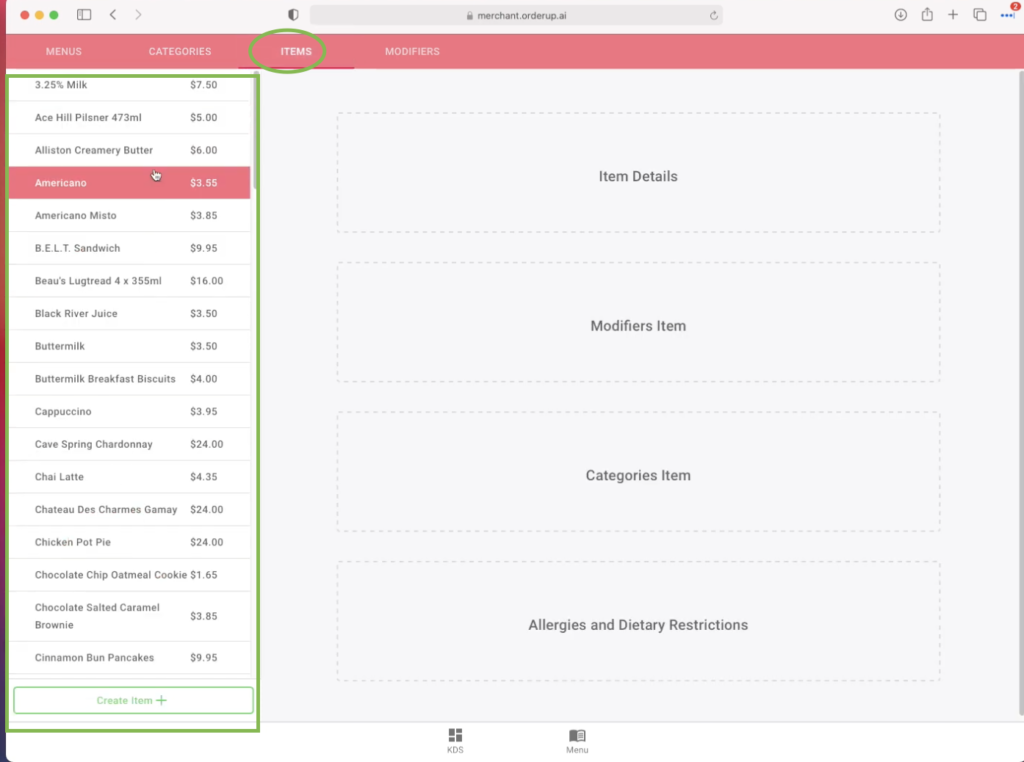
Menu Items
To access, view, or edit items on your menu, you’ll need to open up your Menu Builder and click the “Item” tab at the top of the page. This will bring you to the items page. All your items can be found on the left-hand side, and are sorted alphabetically. You can create, edit or delete items from here.
Tip: Use (ctr+F) or a find function to search more efficiently
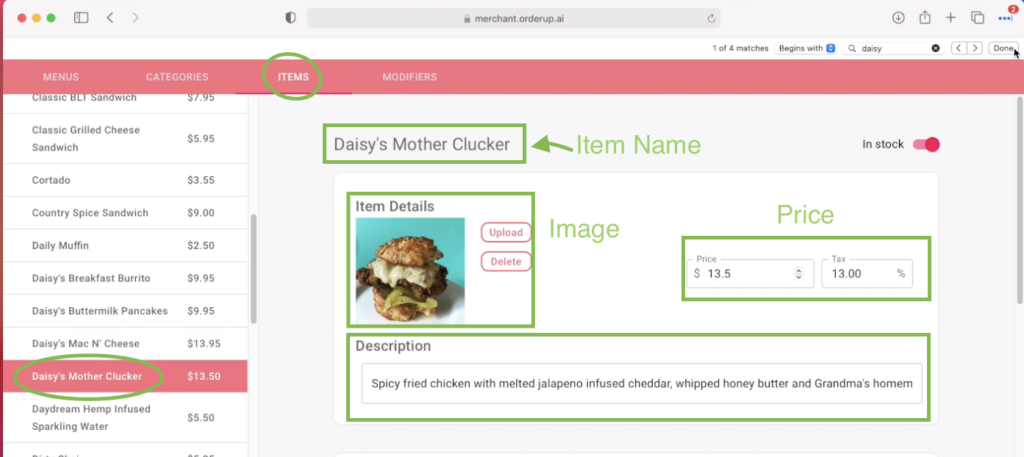
Edit Item Name, Price, Description or Image
To edit all or any Item details such as Item name, item price, item description or image, follow these steps:
- Click on the Items tab at the top of the Menu Builder
- Find the desired item you wish to edit, click it
- Click and edit whichever detail you would like to change or update
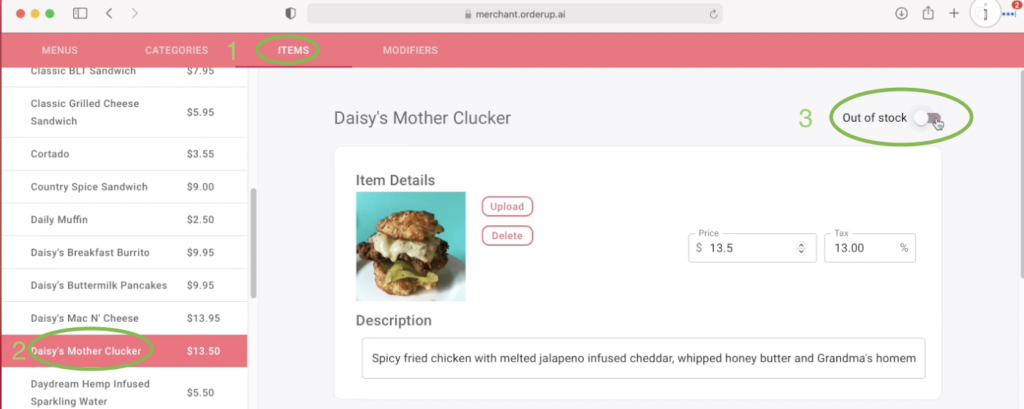
Mark an Item Out Of Stock
This can be done from both the Category page, and within the Item itself.
- Click on the Item tab at the top of the Menu Builder
- Find the item you’d like to mark out of stock on the left hand side, click it
- Toggle the out of stock button towards the top right corner.
Red → IN STOCK
Grey → OUT OF STOCK
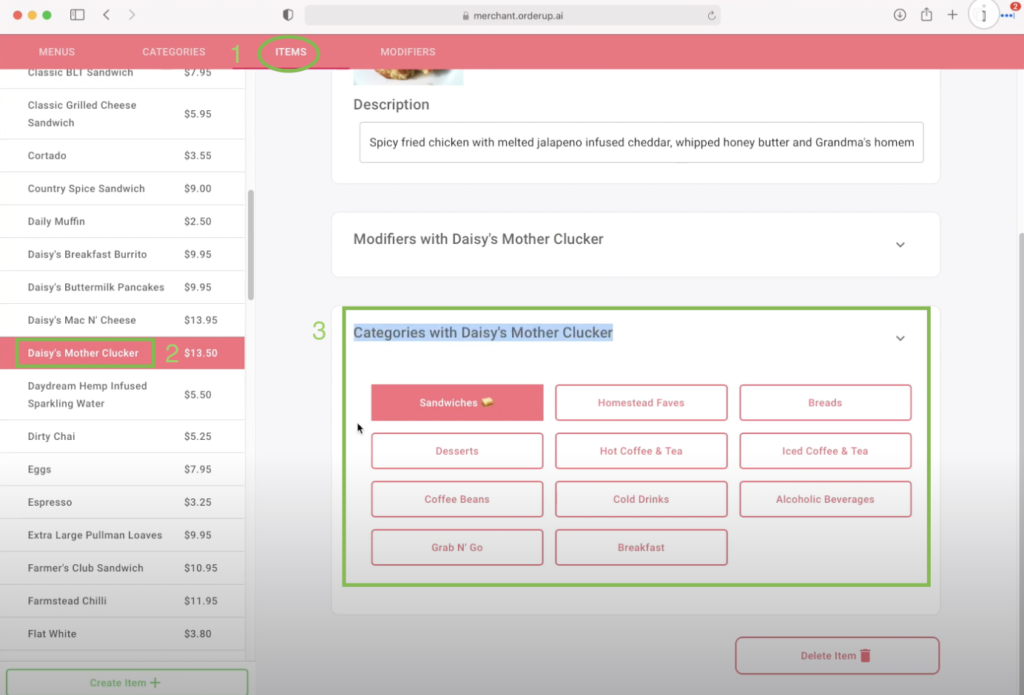
Assign an Item to a Category
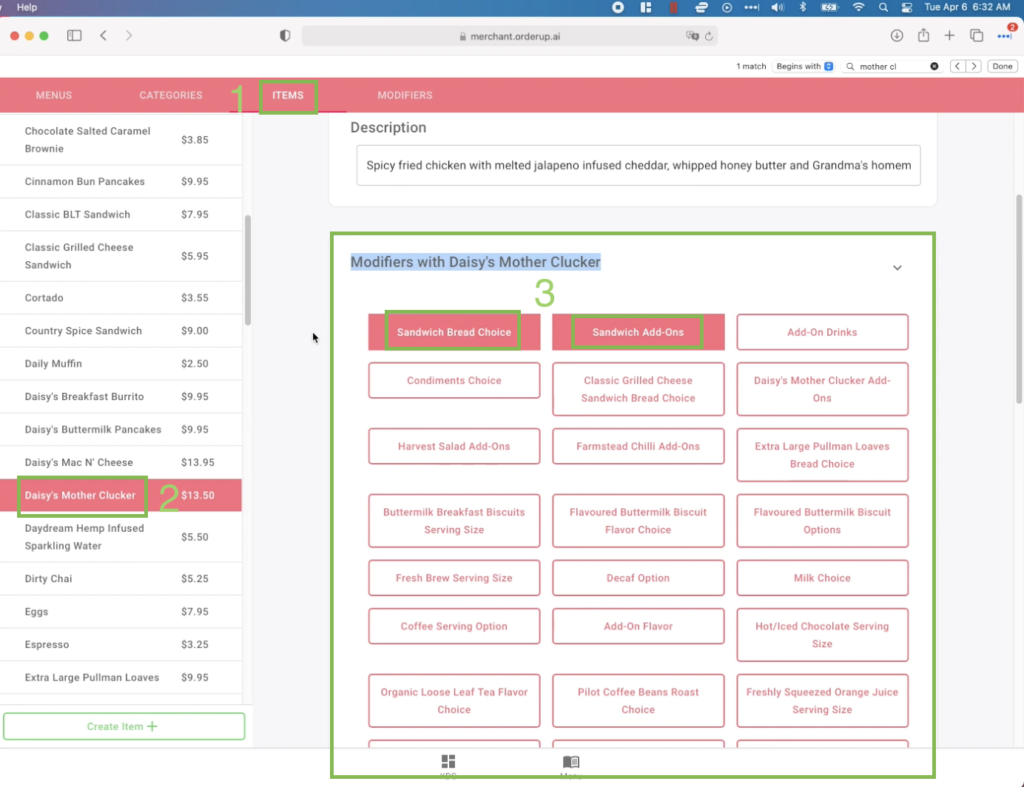
On an Item page, available Categories will appear towards the bottom, underneath “item modifiers”. To assign an Item to a Category:
- Click the Item Tab at the top of the Menu Builder
- Find the Item you’d like to add or assign to a Category, click it
- Scroll to the “Categories with *Item Name*” section,
- Click whichever Category you’d like that Item to appear in
*Items can live in multiple categories.
In the case below, “Daisy’s Mother Clucker” will only appear under the “Sandwiches 🥪 ” category, marked in red.
Change Order of Items in a Category
How to change the order of Items in a Category:
Log into the Menu Builder Application
- Click the Category Tab along the top
- Find the Category in which you would like to change the order of items
- Scroll down, to the “Items in Category” Section
- Drag and drop the items into the desired order
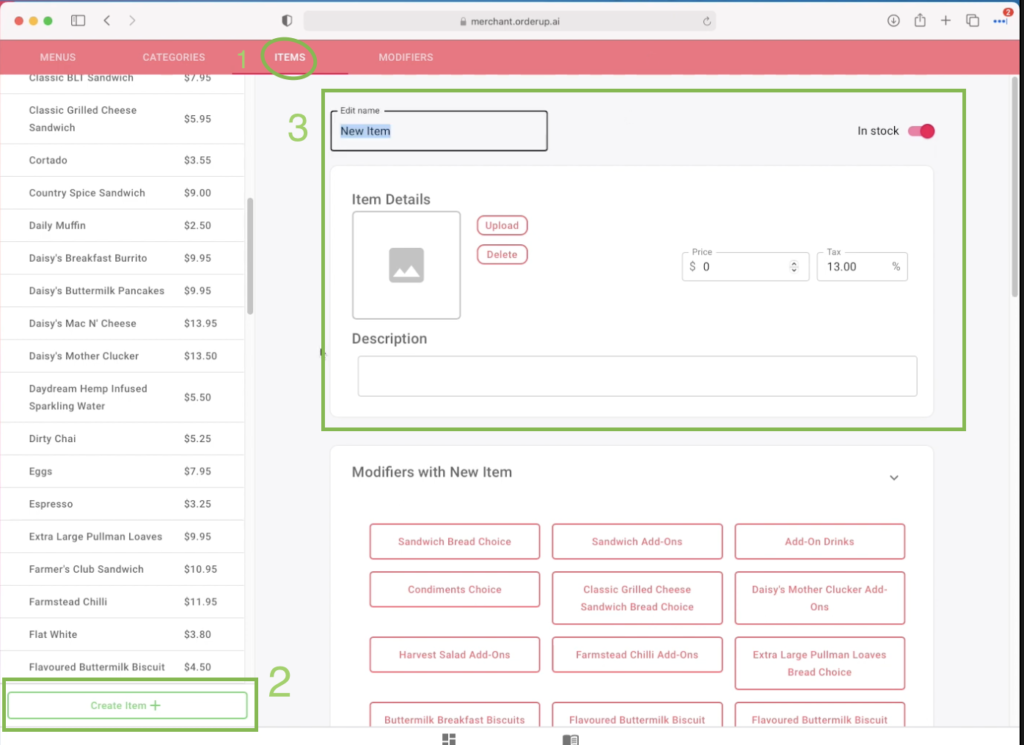
Create a New Item
Creating new items is super easy!
- Click the Item Tab at the top of the Menu Builder
- Click the “Create Item +” Button at the bottom left-hand side
- Fill out the Item details including Name, Price, Description, and Image
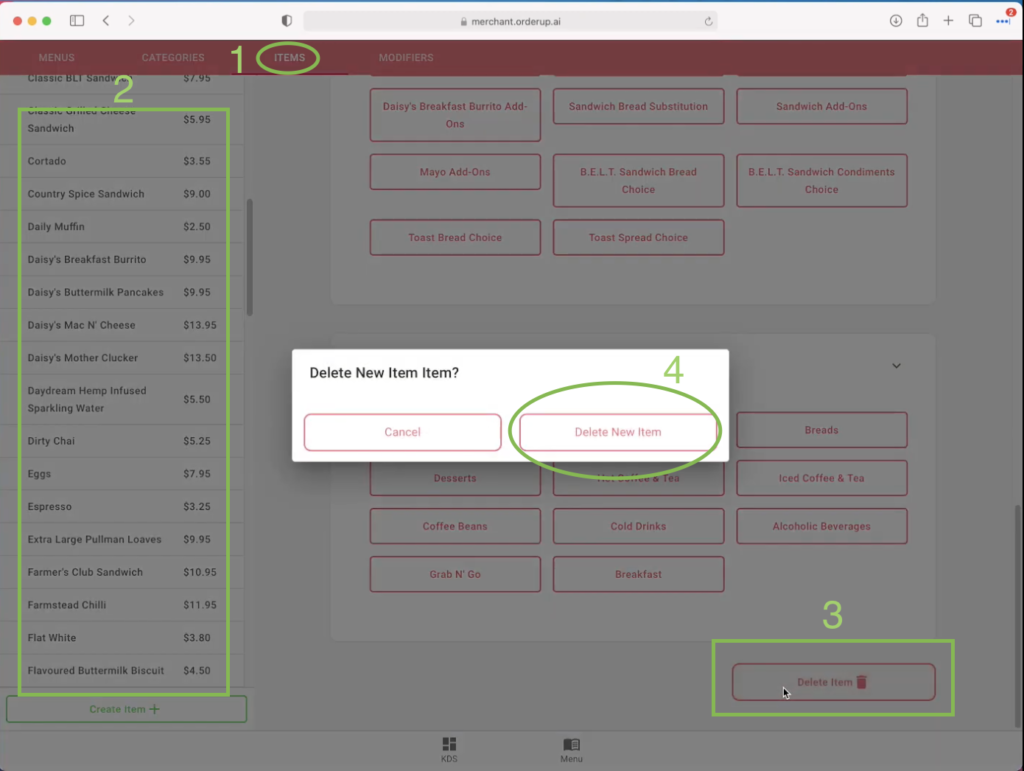
Delete an Item
Deleting an Item is also extremely easy!
- Click the Item Tab at the top of the Menu Builder
- Find the item you’d like to delete on the left-hand side, click it
- Scroll to the bottom of the page, and there will be a “Delete Item” Button towards the right-hand side.
- Click “Delete Item” in the pop up to confirm
Item Modifiers
Modifiers (or add-ons) can be very powerful for boosting average bill size, through recommended pairings or add-ons and to allow for customization. Creating modifiers and modifier groups is an important part of building your menu. Modifiers appear under specific Items and can be assigned to multiple Items.
Modifiers can be accessed and edited in the menu builder. (See below)
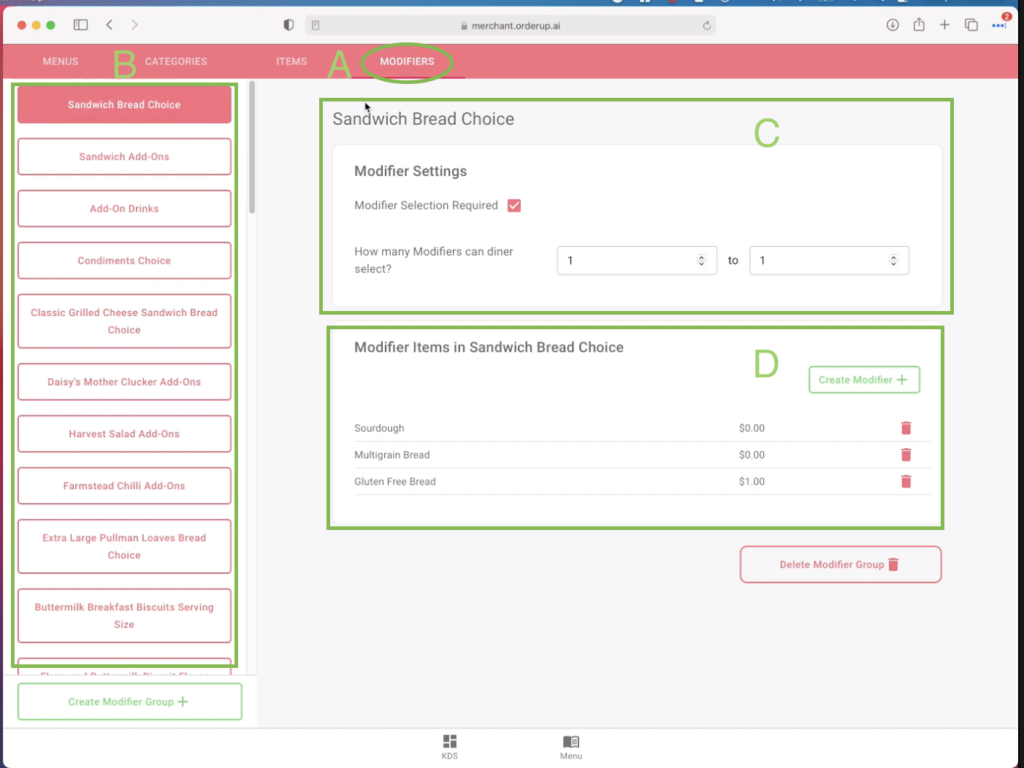
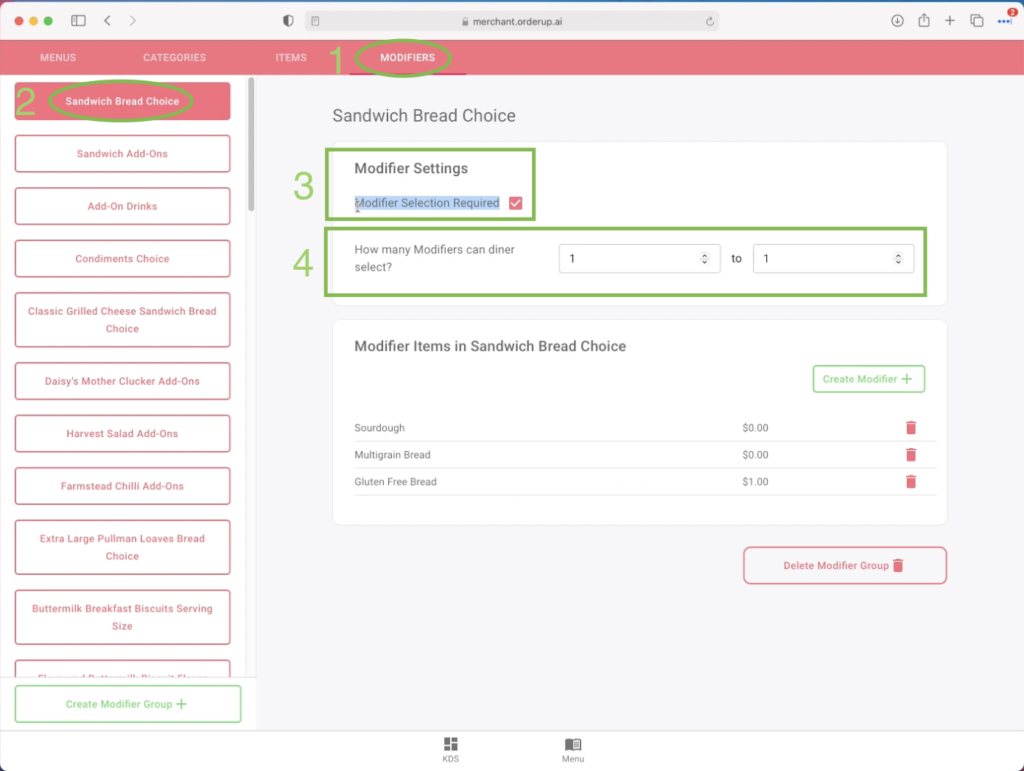
A) Modifier Tab: Your starting point for editing, adding or deleting modifiers items or groups
B)Modifier Groups: Groupings of Modifiers Items to make it easier to assign them to items. For example (below), the Modifier Group “Sandwich Bread Choice”, contains the “Modifier Items” (D)
- Sourdough
- Multigrain Bread
- Gluten-Free Bread
C)Modifier Settings: Important settings such as, is a modifier selection required?
D)Modifier Items: The items which will appear in the modifier groups. These can be edited, added, and also charged for
Edit Modifier Group
If you need to make an update to a modifier group, follow these steps.
- Click on the Modifier tab at the top of the Menu Builder
- Find your desired modifier group on the left hand side of the page
- Make any desired changes to the modifier items or settings
Edit a Modifier Group Details
Here are some of the important settings that you want to be careful when selecting. You’ll want to make sure that the modifiers make sense, and that the correct information is being sent to the kitchen.
- Click on the Modifier tab at the top of the Menu Builder
- Find your desired modifier group on the left hand side of the page
- Choose if the Modifier selection is required (is it?)
- Choose how many Modifiers a diner can select within the item. (*if only one modifier selection can be made, set as “1 to 1”)
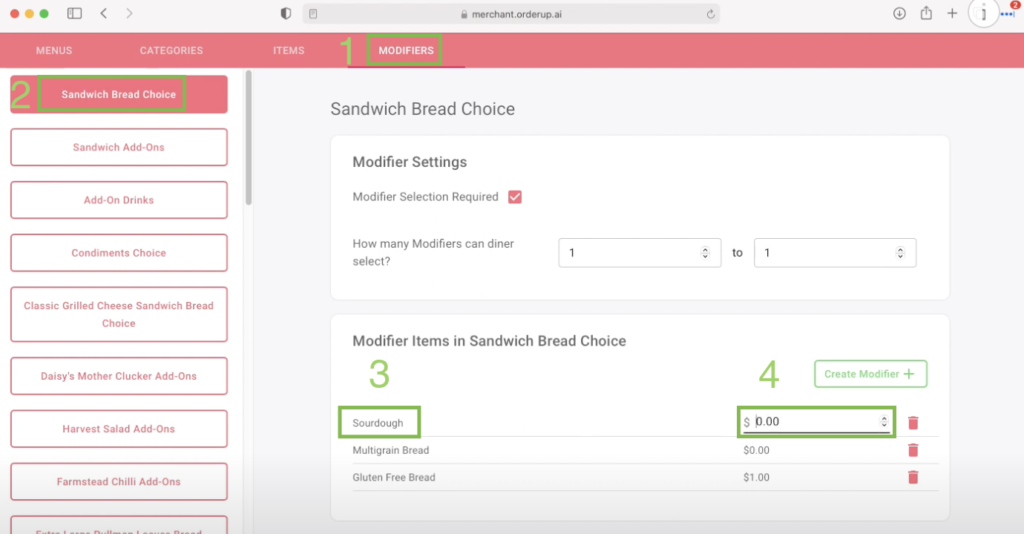
Change Name and Price of a Modifier Item
All modifier items can be assigned a price. You can include as many or as few as you’d like.
- Click on the Modifier tab at the top of the Menu Builder
- Find your desired Modifier Group on the left hand side of the page
- Click on the Item Modifier Item Name to change it
- Click on the modifier price to change it
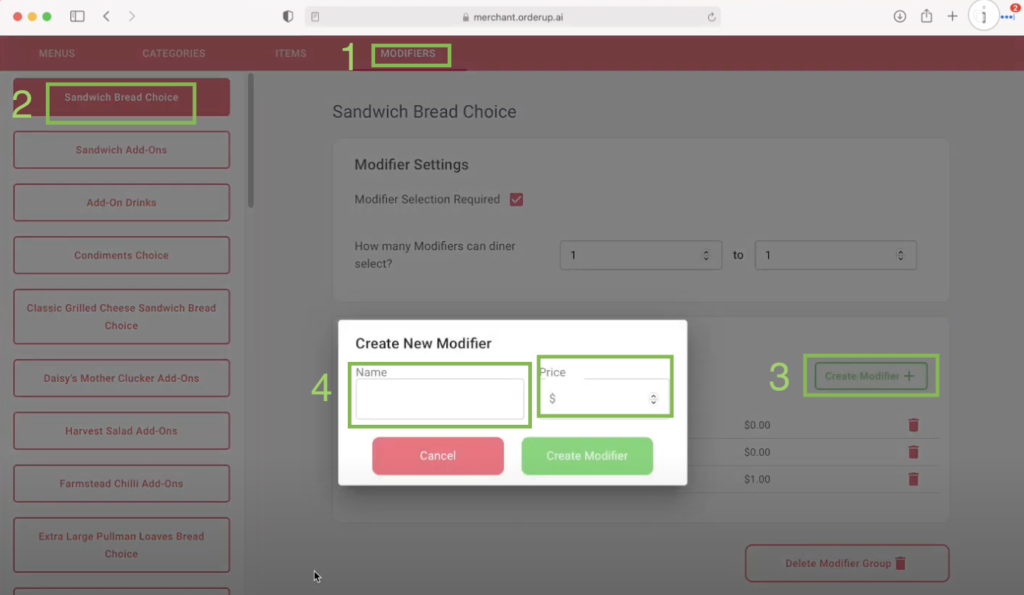
Create New Modifier Item
- Click on the Modifier tab at the top of the Menu Builder
- Find your desired modifier group on the left-hand side of the page
- In the Modifier Item section for your Modifier Group, towards the bottom, click the “Create Modifier +”
- Input the Name and Price (if applicable) in the popup
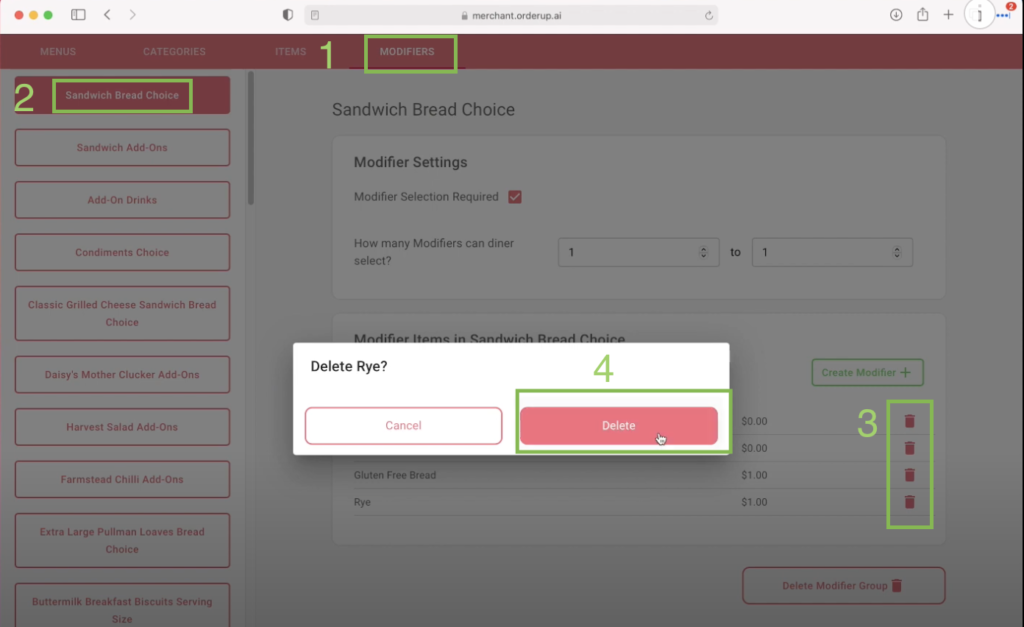
Remove a Modifier Item
Removing Modifier Items is very simple:
- Click on the Modifier tab at the top of the Menu Builder
- Find your desired Modifier Group on the left hand side of the page
- Navigate to the Item Modifier Section, click on the red garbage can next to the modifier item
- Confirm by clicking “Delete”
Associate Modifiers With Items
- Click on the Items Tab at the top of the Menu Builder
- Find the item you want to associate the modifier group with, Click into it
- Click on the Modifier Group(s) you’d like to associate with the menu
Merchant Settings
Merchant settings is a new page in the Menu Builder Application. It can be accessed by clicking the “gear” button, at the bottom, to the right of the “Menu” tab.
Toggle “Accepting Orders” On and Off
- Click the Settings tab at the bottom right of the Menu Builder
- Toggle the Switch
- Accepting Orders (right, dark)
- Not Accepting (switch left, light)
Show Order Totals on All Columns of KDS
- Click the Settings tab at the bottom right of the Menu Builder
- Toggle the switch
- Show Totals on all columns of KDS (Right, Dark)
- Don’t Show Totals on all columns of KDS (Left, light)
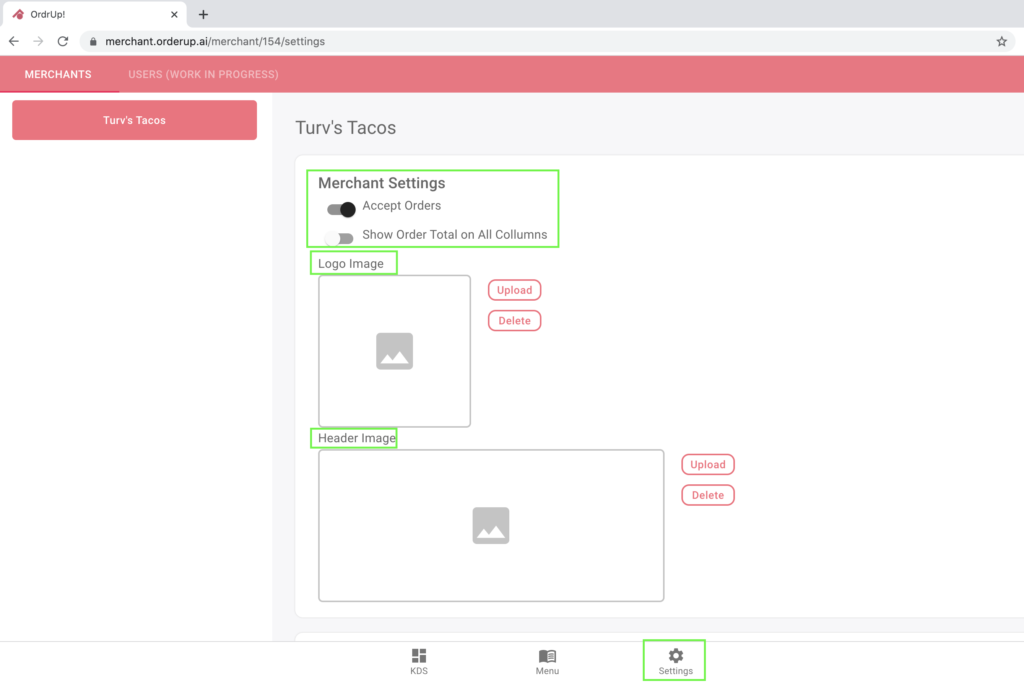
Upload or Change Logo
- Click the Settings tab at the bottom right of the Menu Builder
- Click the Upload button next to the Logo Image Box
- Choose your desired logo
- Click open
- Crop, flip or zoom, then click Done in the top right corner
Upload Header Image
- Click the Settings tab at the bottom right of the Menu Builder
- Click the Upload button next to the Header Image Box
- Choose your desired header image
- Click open
- Crop or fit your header in the shown box, then click Done in the top right corner
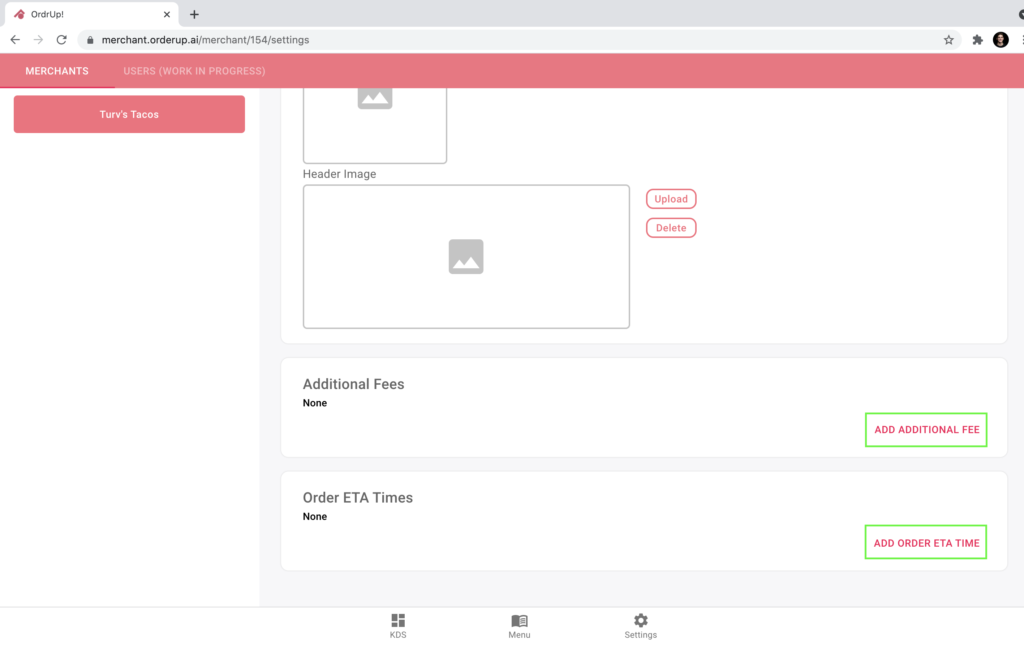
Add Additional Fees
- Click the Settings tab at the bottom right of the Menu Builder
- Click the Add Additional Fees box towards the bottom of the page
- Input name of fee, then description #1 with the price
- Choose where you want the fee to show up, or if it’s optional or taxed at the bottom of the popup
Edit Order ETA’s
- Click the Settings tab at the bottom right of the Menu Builder
- Click the Edit Order ETAs box at the bottom
- Input the time you wish to have available
- You can have multiple times (as many or as little as you’d like)
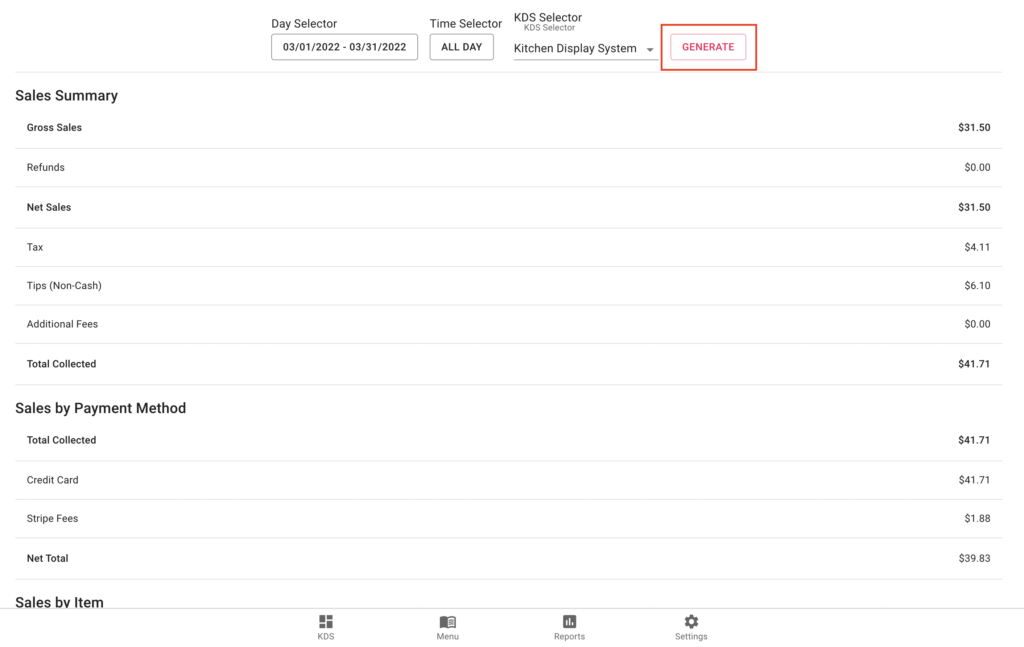
Generate Reports
- Navigate to the new “Reports” Tab on the bottom

Once on the reports page:
- Select the KDS or Order Management System in the dropdown
- Click Select Date or Time Selector
- Choose your desired date range
- Click Confirm
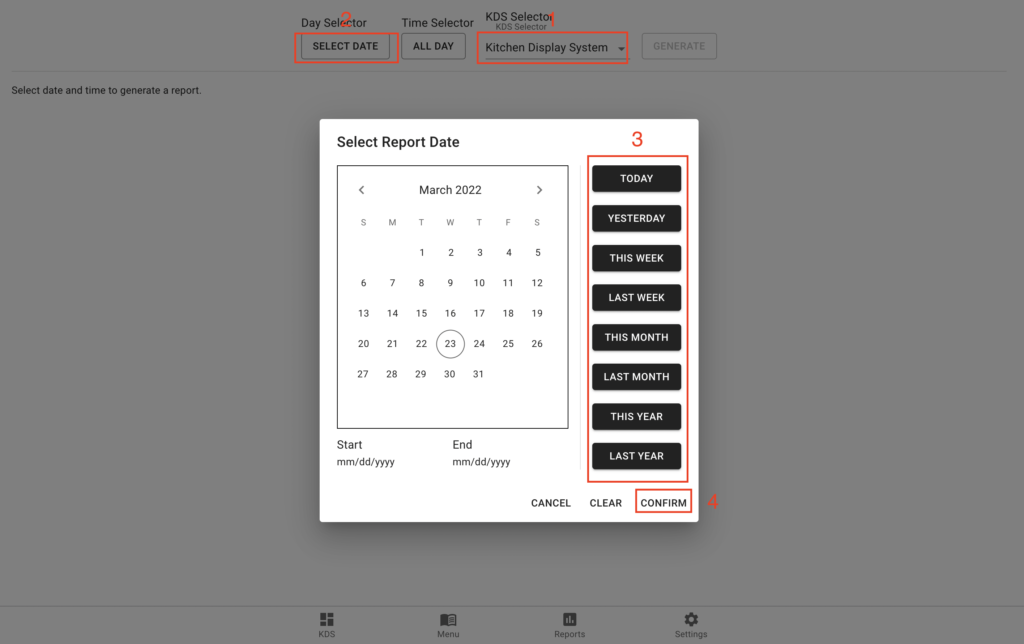
Last step is click GENERATE at the top right, and a full, itemized report should appear on your Order Management System.
Let us know if we missed anything! Please feel free to reach out to [email protected] if you are running into any further issues.