Product Updates – May 2021
Posted on |
Another big month from our engineering team! Here are some of the new features, fixes and updated we've been working on in May 2021
We’ve made a lot of updated during the month of May. Some big, some smaller, but at the end of the day, it will make a difference to all of our partners and their ability to get the most out of OrderUp’s contactless dining solution.
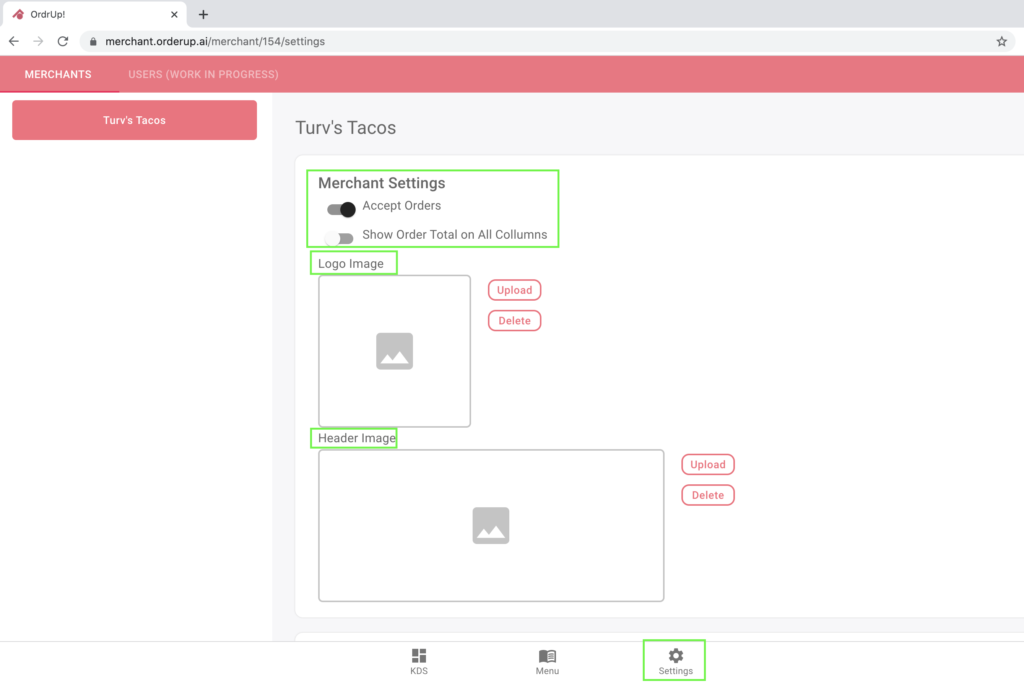
Merchant Settings Page
We’ve been working on creating an easier, more intuitive menu builder that ultimately gives our partners more control over their menu. The goal of this page is to make certain aspects of menu building, testing and changing just a little bit easier. You can access the Merchant Settings page at in the bottom navigation bar of the menu builder, to the right of the the Menu Tab. Some of the new features now include:
Revamped Header and Logo Image Uploading
It’s now easier than ever to upload new header and logo images. Switching the header, and testing different colour schemes can come in handy if you’re interested in digital menu optimization.
Toggling ‘Accepting Orders’ on and off
This feature is useful if you’re running into a busy rush, or if something internally happened forcing your restaurant to close down during business hours unexpectedly. It could even be used to just generally close down a little early, and get out a bit faster after a long day. It’s really up to you how you use it. See below:
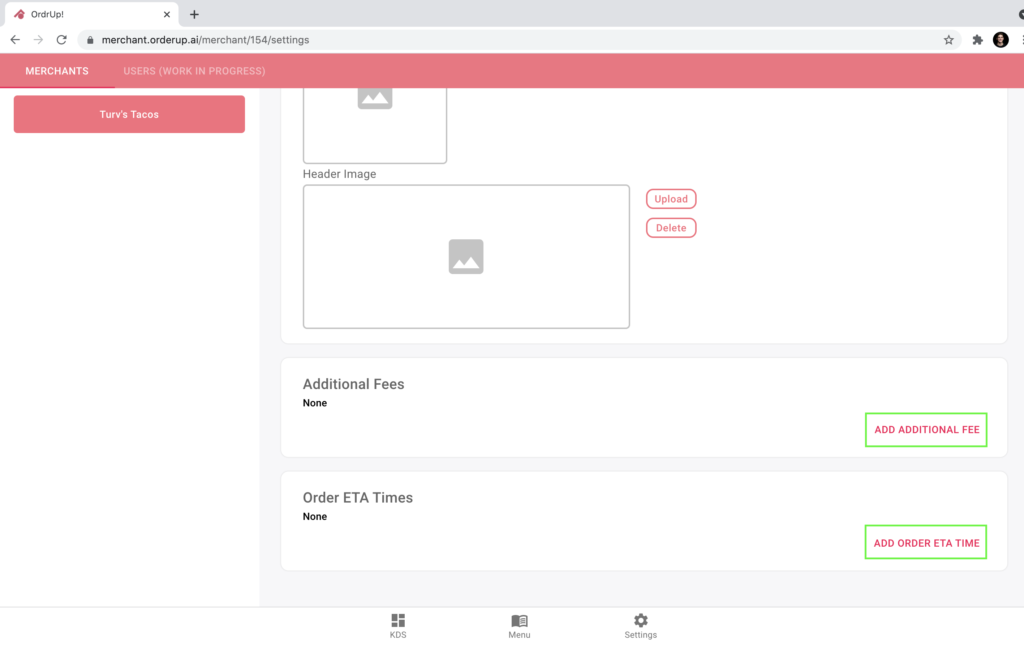
Adding Additional Fees, Such as Room Service Fee or Delivery Fee
These updates were added with by request from some of our partners who run their own delivery, and our partners in the hotel space. Like any of our features, these can be used however you see fit, or reflect any extra costs that may be incurred in specific scenarios. These fees can be added on the merchant settings page. Please reach out to us ([email protected]) if you’d like help setting up any additional fees.
Creating Custom Order ETA times
Set the Order of Menu Categories and Items in Categories
It’s now easier than ever to change the order of:
- Categories Within a Menu
- Items Within a Category
Having the ability to switch the order of this gives you a whole new level of control, when it comes to menu optimization and testing. By analyzing which items have the highest sales volume and profit margin, you’re able to test placement of items (among other item details) to find which is order results in the most profit. We go over this, and some menu testing strategies in this blog post.
How to change the order of Categories within a Menu:
Log into your Menu Builder Application
- Click on the Menu Tab at the top left
- Click the Menu in which you want to adjust the order of the categories
- Scroll down, and you will see the number of which the categories appear
- Drag and drop the categories to the desired position (order)
 ” would appear before “Vegan Tacos
  ” in the “Everyday” Menu.
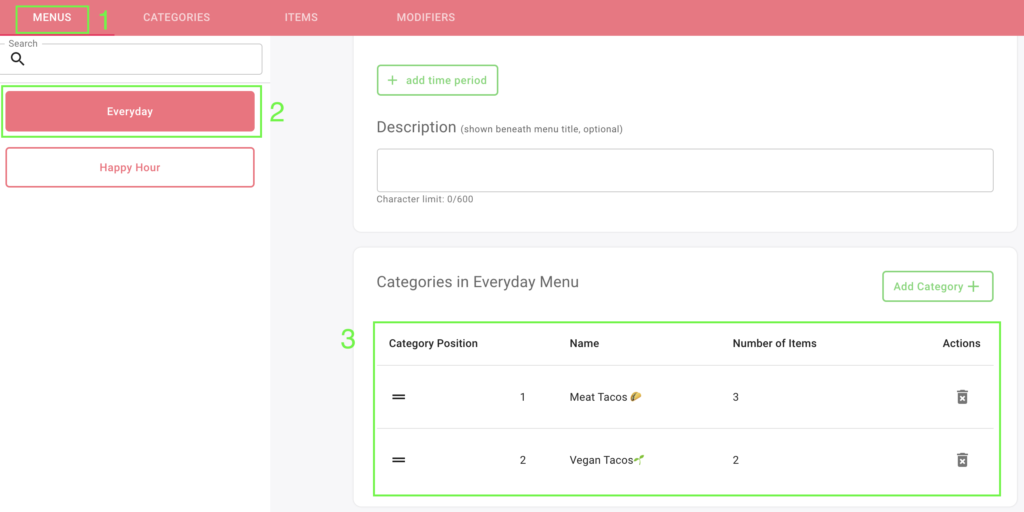
How to change the order of Items in a Category:
Log into the Menu Builder Application
- Click the Category Tab along the top
- Find the Category in which you would like to change the order of items
- Scroll down, to the “Items in Category” Section
- Drag and drop the items into the desired order
“, the “Blackened Shrimp Taco” is placed first, followed by the Spicy Chorizo.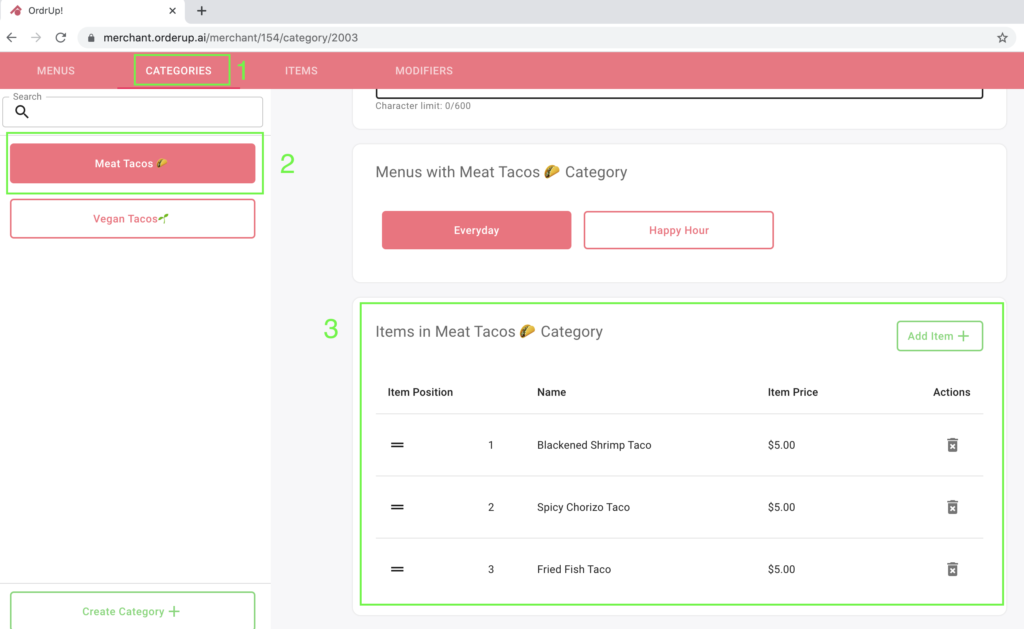
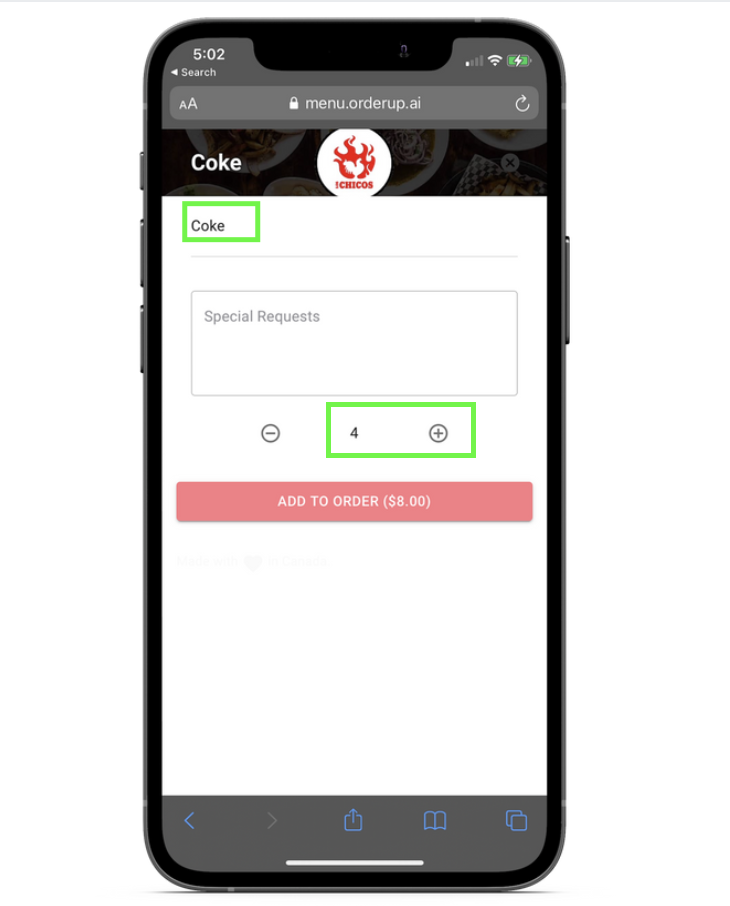
Easier Ordering for Multiple Items
Now, when a guest orders an item, they can toggle between quantity at the bottom. This small addition makes it easier for customers to add multiple items.
In this case, we’ve added 4 Coke’s to the order.
Auto Gratuity Available
Auto gratuity is now available for all merchants. Please contact us if you would like to enable this feature as it’s currently not available in the Menu Builder. ([email protected])
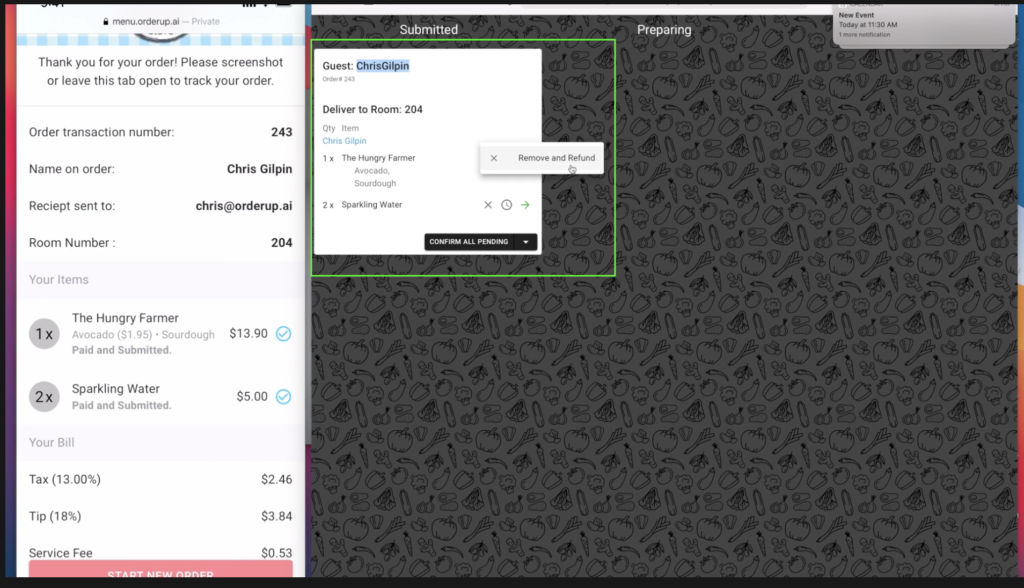
Guests Email with Orders on KDS
The guests email is now visible with their order, across the KDS.
Showing Order Totals in all KDS Columns
This feature makes it easier than ever to order total amounts across the KDS. Simple, but effective in tracking order totals throughout nights. Note, this isn’t shown in the example or images in the following section.
Fully Functional “Pay Upfront”
While being relatively self descriptive, the pay upfront functionality adds a whole new layer of how merchants can accept orders. The pay upfront functionality allows for a much more seamless flow of ordering and payment for a variety of use cases.
For a full Tutorial On Pay Upfront: CLICK HERE
Two main use cases for pay upfront functionality:
- Accepting Online Orders For Takeout
Alongside dine-in or traditional ordering, this gives restaurants the power to accept online orders from their website, social media, or anywhere else the menu URL exists.
2. Line Busting for Food Trucks & QSR’s
When dealing with long lines & wait times – food trucks or small quick service restaurants are able to accept orders, and give guests an ETA of when their meal will be ready. Having a long line is generally a good thing for every restaurant, but it can still be a deterrent to attract new customers. A recent study found that “85% consider or outright leave a perceived long line.This is up 8 points from February 2021.”
3. Hotel Room Service
Average Revenue per room available is an important metric for those in that space of hospitality. We believe that making room service contactless, and available through a guests smartphone, it can help improve this metric. There’s also the safety aspect of travellers and limiting physical touch of surfaces as much as possible.
Flow of Pay Upfront: From Diners Perspective
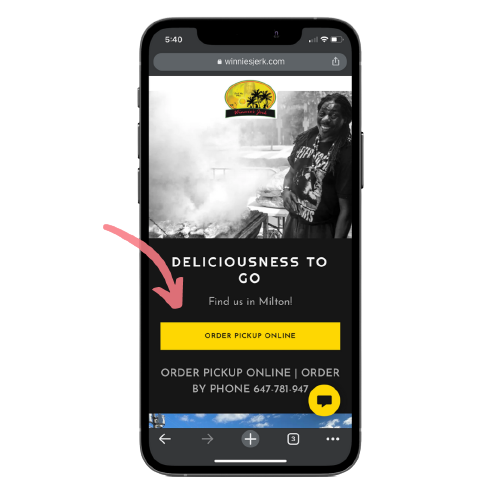
1. How Guests Can Access Menu to place Orders (Guest Side)
Guests access your menu from either a QR code placed at the front of house, or outside the restaurant/food truck. Or, guests access the menu from your website/social media.
In this example, we’ll be accessing Winnie’s Jerk’s (food truck) Menu from his website, on a mobile device.
If you’d like to place an “order pickup” button on your website, but aren’t to comfortable with making site changes – let us know. We’re happy to handle this part and update your website.
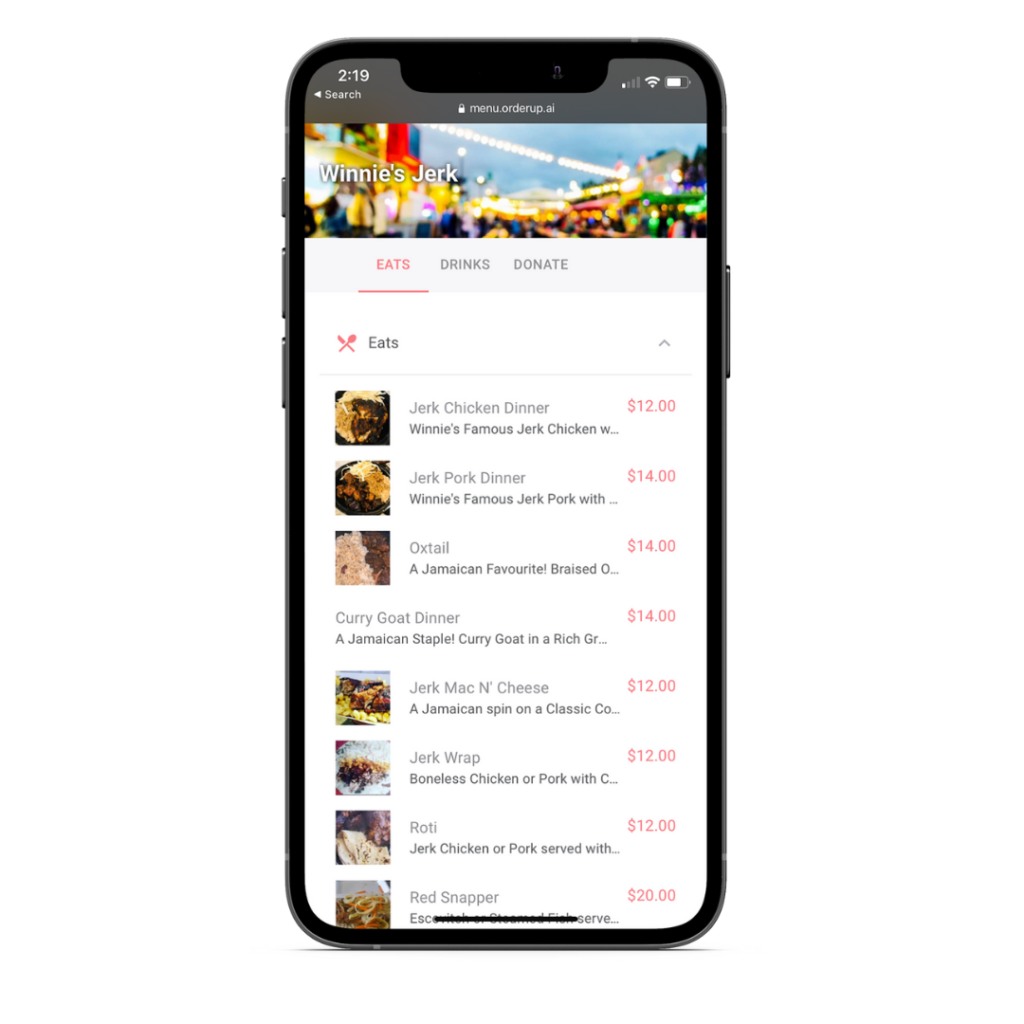
2. Menu & Ordering (Guest Side)
Once in the menu, guests can browse through and select items to add to cart. When the order is complete, they hit submit at the bottom of the page.
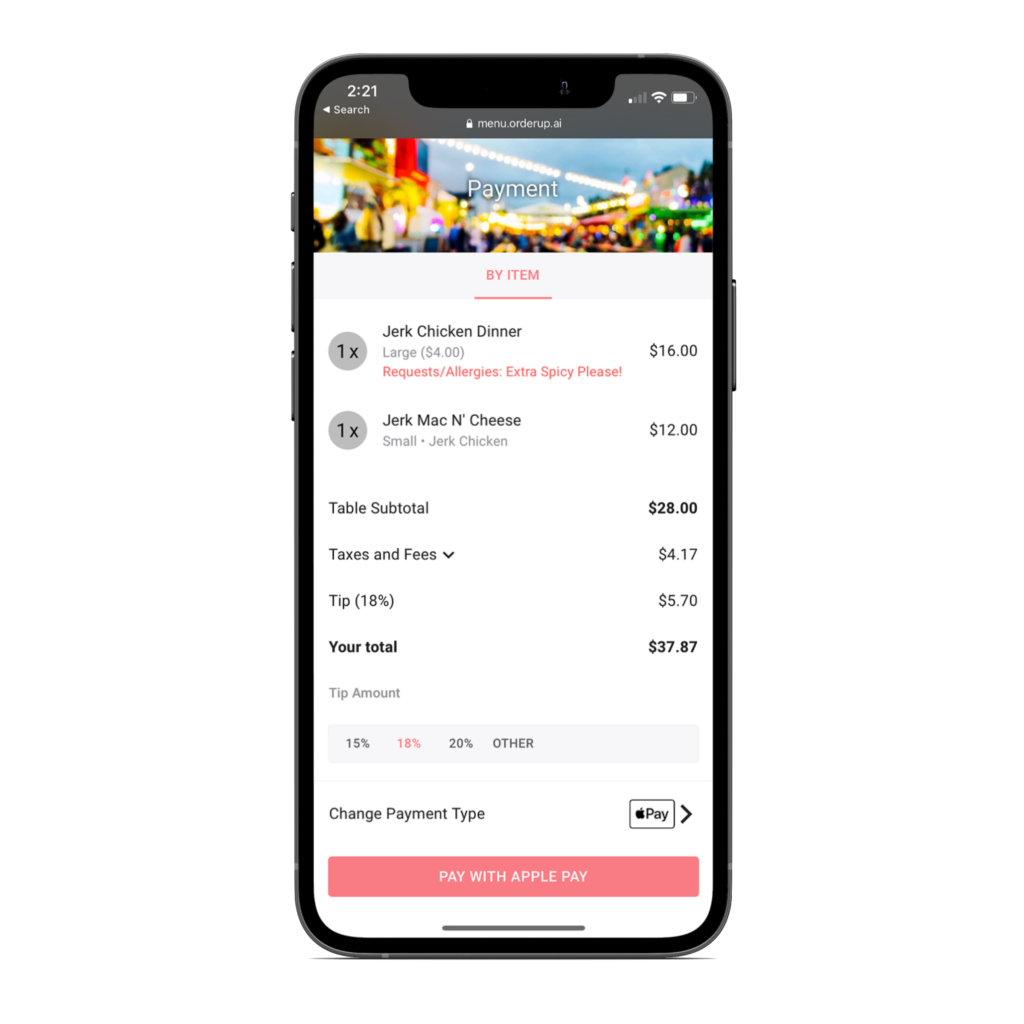
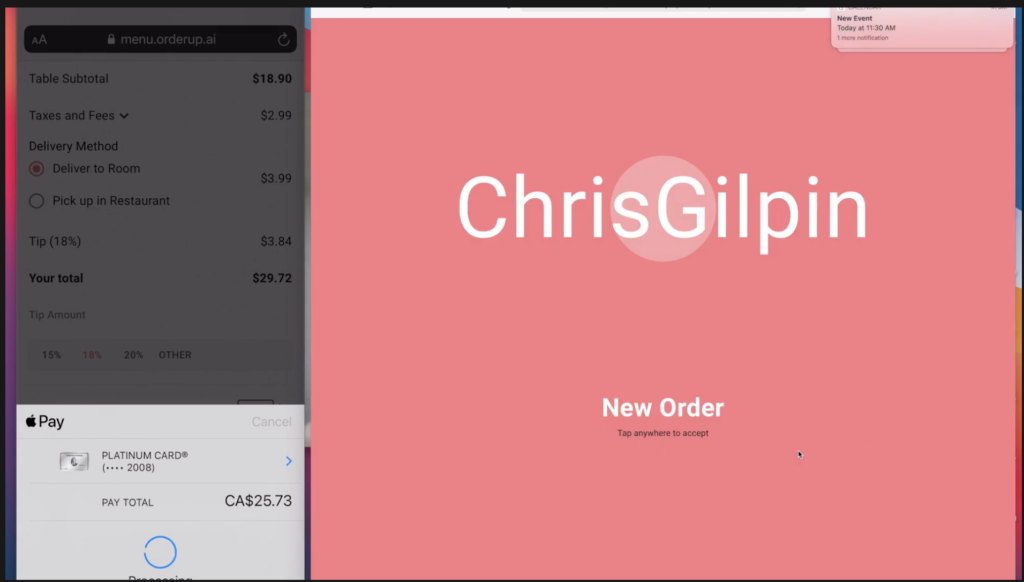
3. Submit Order and Pay (Guest Side)
This flow remains constant for ordering, but as soon as a guest makes the payment, this is when the order will appear on your KDS.
Pay Upfront: Merchant Side (KDS)
After an order is placed and paid for, both a sound and a screen will appear with the name of the person who ordered, on your KDS. This is meant to alert staff, and make sure no orders are missed.
On the left side of the image below, we see the confirmation of the order from the Diners Phone, and on the right side is the KDS.
Note: This example is using Room service for a hotel. The flow would be the exact same if you were to accept an order from your website.
Once a member of the staff taps anywhere on the KDS, it will bring them to the traditional KDS screen, showing the order in the “Submitted” column.
From here, staff will have the ability to “Remove and Refund” if an item is out of stock, or unavailable. The person ordering will also get a notification on their screen alerting them an item was removed.
Beside each item, the small “clock” is where you can choose an ETA. The ETA is also reflected on the diners mobile device.
Once ready to move on, staff hits the “confirm all pending” button which will move the order to the preparing column. See below:
Once the order is confirmed, it will be reflected on the orderers phone and moved into the “Preparing” column on your KDS. See Below:
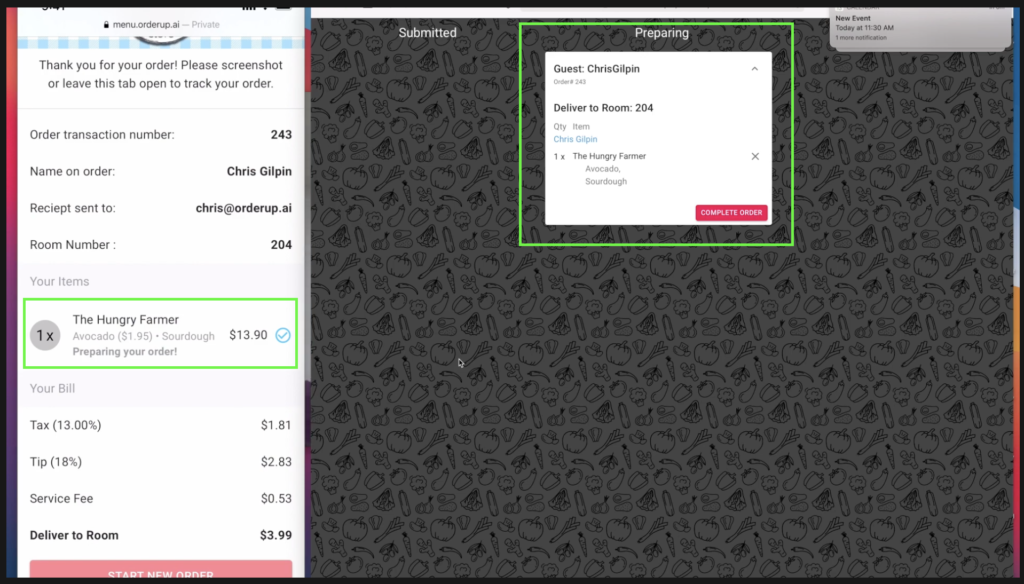
Once the order is prepared, and ready for pickup, a staff member presses “complete order”. As you can see, there’s a chance to do a full refund incase there was an issue with the order. If it went smoothly and there are no problems, press “Close Order”. See Below:
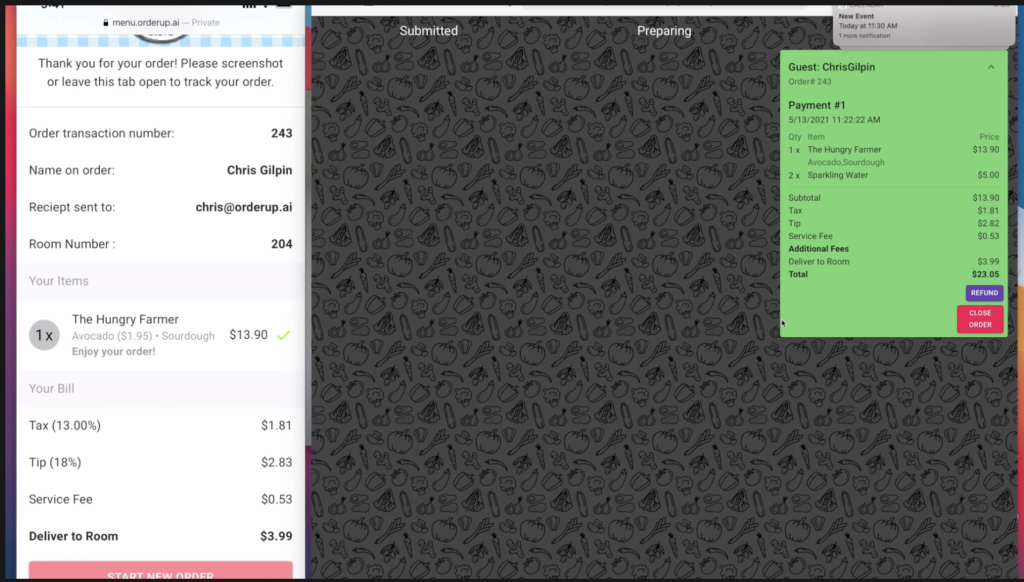
After clicking close order, a popup will appear, confirming that you would like to close the order. After you click this, it’s all done and you’re ready to take your next order. See Below:

Overall Performance Enhancements
We’ve had a huge month in cleaning up some of the engineering on backend of both the Menu Builder, KDS, and Menu itself. This means faster loading times, quicker responsiveness, and an overall improvement in the user experience.
That’s it for May! If there are any features you’d like to see in the future, please feel free to reach out to us at [email protected]. We appreciate any feedback or insights into how we can help your restaurants operation.