How can we help?
If you can’t find what you’re looking for, please call our support team here:
call: 1-(833)-216-2366 x7
email: [email protected]
Diner Troubleshooting (FAQ)
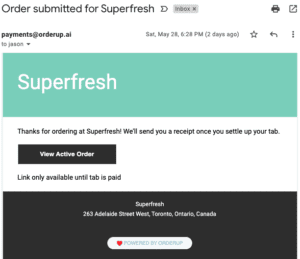
- Tell diner to check their EMAIL messages for an access link from [email protected]
- Click "View Active Order"
What it looks like:
Email:
SMS/Text:
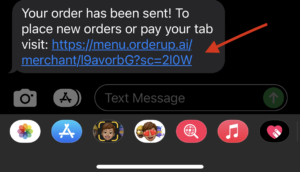
The link will restore the diners session and allow them to pay.
- Tell diner to check their EMAIL messages for an access link from [email protected]
- Click "View Active Order"
What it looks like:
Email:

What it looks like:
SMS/Text:

The link will restore the diners session and allow them to pay.
If this is still not possible, it might be due to an older device or unseen bug.
Resort to using "PAY CASH EXTERNAL"
- Ask the guest for their name and table order.
- On the Order Management System (tablet), search for the Table # in the top right corner of the order page
- Find that specific guests order in progress
- Click the Three Dots on next to their order on the right hand side (...)
- Click "Pay Cash External"
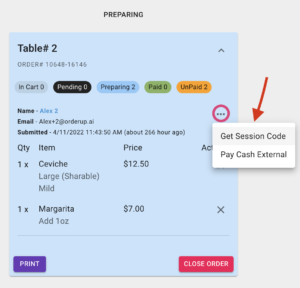
7. An alert will pop up, confirming that this the bill will be paid for using Cash or Debit. Confirm if this is the case.
8. Cash out the guest using the POS & Payment terminal or Cash.
- Tell diner to check their EMAIL messages for an access link from [email protected]
- Click "View Active Order"
What it looks like:
Email:

What it looks like:
SMS/Text:

The link will restore the diners session and allow them to pay.
When a guest can't access their order, and does not have the access link in their text messages or email (check spam), use a Recover Session Code" from the Order Management Interface (or tablet)
- Ask the guest for their name and table order.
- Go to the Order Management Interface tablet, and click the 3 dots towards the top right of the guests ticket.
- Click "Recover Session Code"
- This will display a QR Code for the guest to scan and access their order.

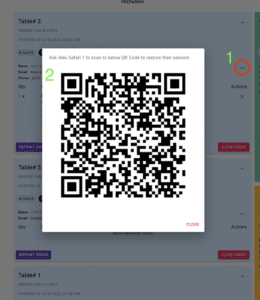
- On the Order Management System (tablet), search for the Table # in the top right corner of the order page
- Find that specific guests order in progress
- Click the Three Dots on next to their order on the right hand side (...)
- Click Get Session Code
- Ensure the guest's Camera is on for normal photos (not panoramic, video or any other setting)
- Ensure QR Code Scanning is Enabled (green toggle) in Camera Settings
- Go to the phones Settings
- Search or browse for Camera Settings
- Toggle "QR Code Scanning" to green
- Try Scanning again
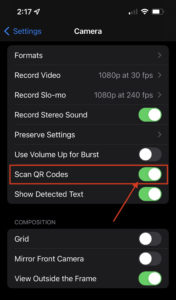
If the guest is still unable to access the menu, it could be due to an older or unsupported phone model.
In this case of an older phone:
- Option1: Have someone else order for the guest at the table
- Payment (optional): have another guest cover the payment
Option 2- Other member at the table can't cover the bill or the guest is alone:
- Bring the guest a menu, and take the order traditionally
- Punch items in to POS and settle payment with a terminal or cash.
Diners are not able to switch tables until their tab is paid at the original table.
Steps:
- Make sure the diner is settled up on their original table
- After payment, they will be able to "Change Tables" and enter the new table number or Scan the new QR code.
If a guest would like to join another table, they must close out their tab at the original table before scanning a new QR code. They will be blocked from joining a new table until the original one is paid for.
The diner should get a notification letting them know:
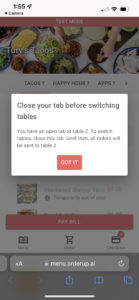
This guest will have to complete payment at their table before being able to order from a new table or QR code.
If they wish to continue ordering, note that the items will be delivered to the Original Table.
If a guest is not able to use a credit card or Visa-Debit card, and can only pay using Cash or debit only, you will need to use "Pay Cash External".
- Ask the guest for their name and table order.
- On the Order Management System (tablet), search for the Table # in the top right corner of the order page
- Find that specific guests order in progress
- Click the Three Dots on next to their order on the right hand side (...)
- Click "Pay Cash External"

7. An alert will pop up, confirming that this the bill will be paid for using Cash or Debit. Confirm if this is the case.
8. Cash out the guest using the POS & Payment terminal or Cash.
MANAGING ORDERS – DINE-IN
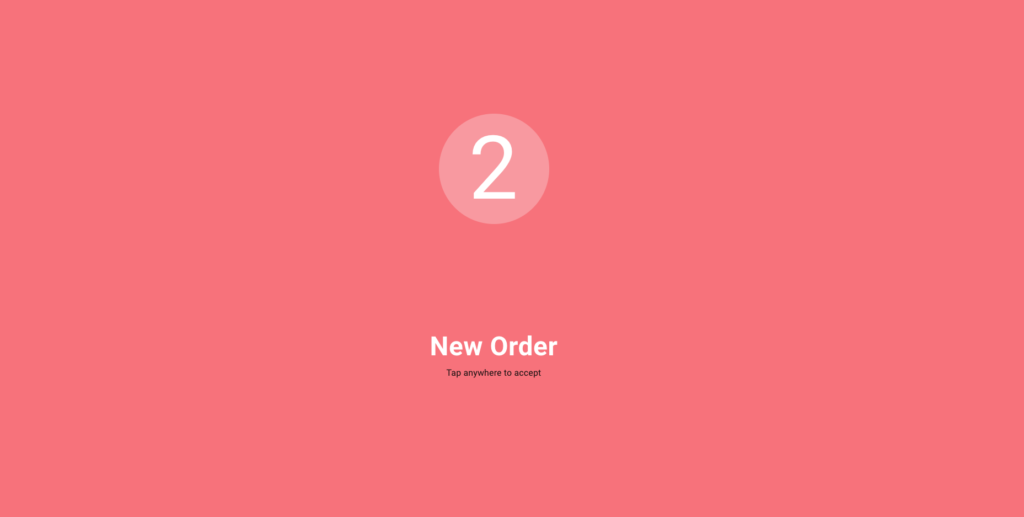
- When a new order is placed, your order management tablet will show a new order screen with the Table Number & a sound notification will play.
- Tap the screen to view the new order in the "Pending" column. If there is a ticket in that column they should be reviewed and confirmed ASAP.
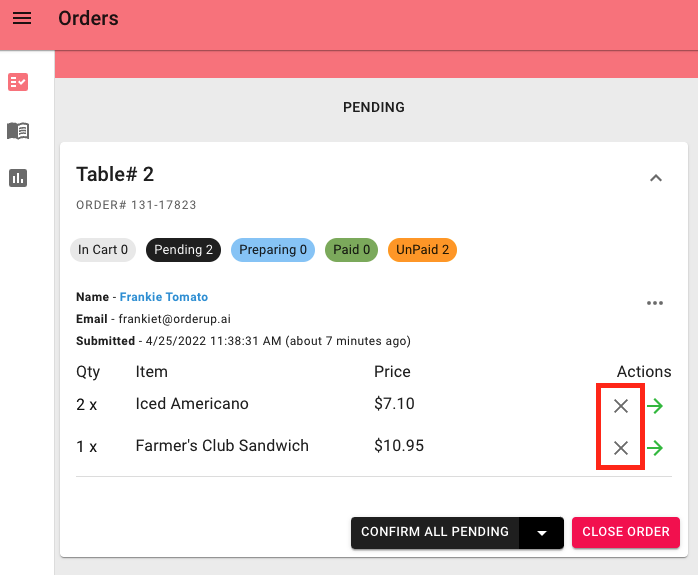
- Review the order, and if everything is OK, click the "Confirm All Pending" button. The order will now print to the kitchen/bar and move to the "Preparing" column.
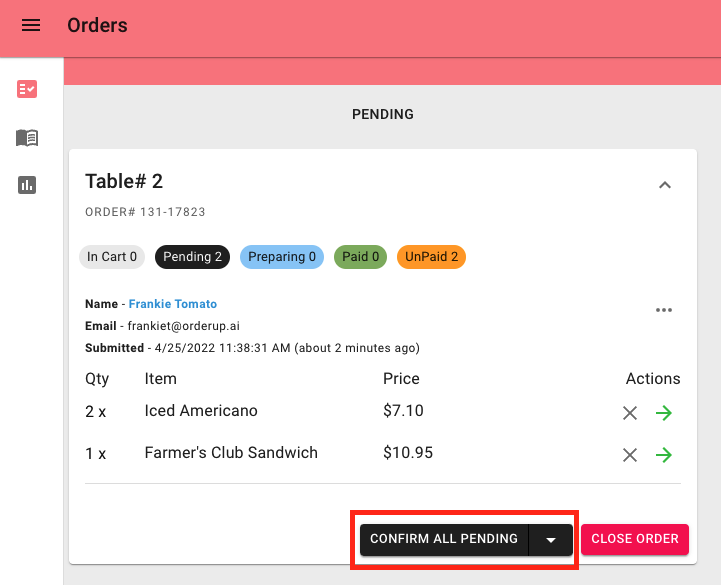
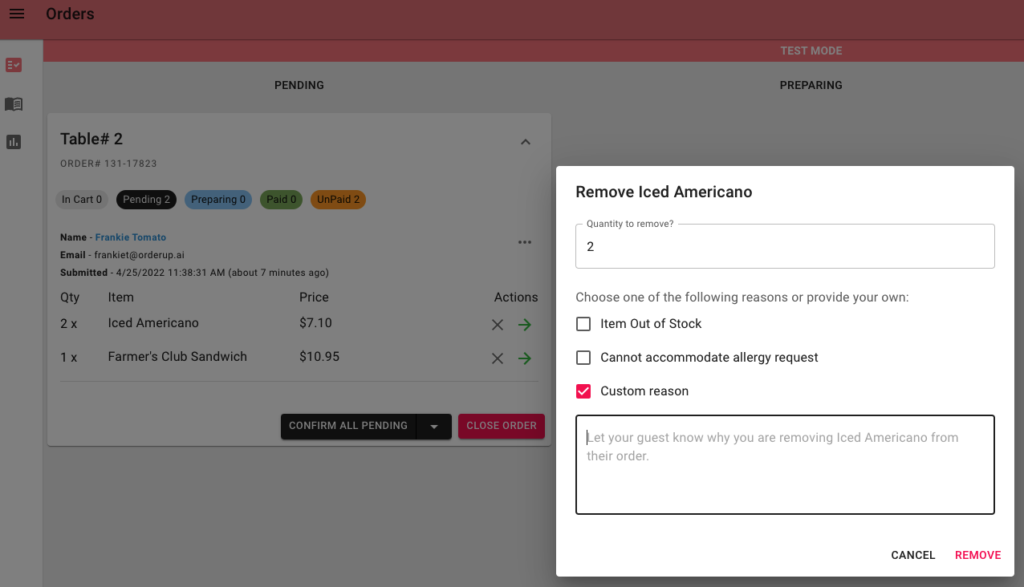
Reject an order or individual items by clicking the "X" next to the item.
Select the quantity of the item (if applicable) you'd like to remove & the reason why.
The guest will be notified that the order can't be fulfilled.
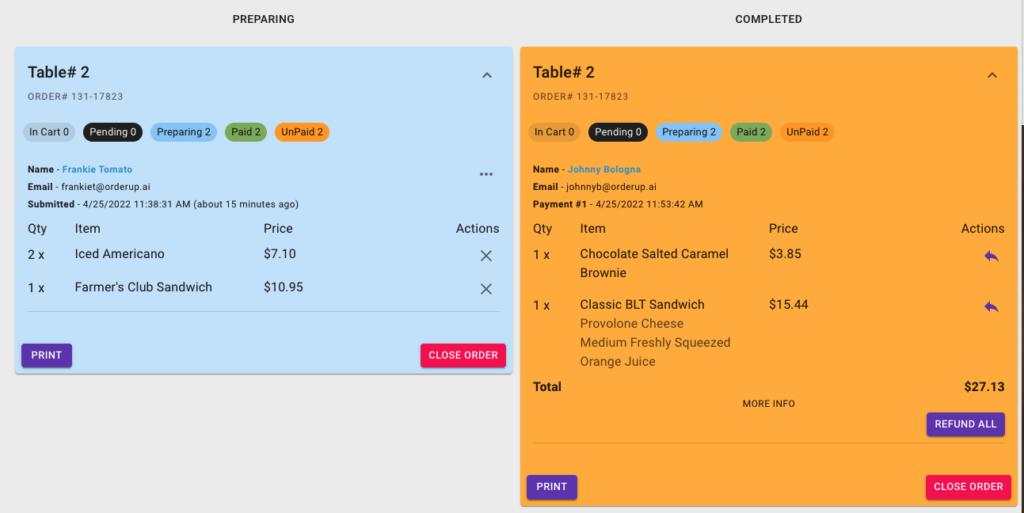
Once a guest pays for their order, the ticket will move to the Completed column.
Partially paid tables will show an Orange ticket.
NOTE: You can use the pills at the top of the order ticket to see the status of the entire table's items.
Once a table is fully paid for, the ticket will turn Green. This means the order is Closed and the table is ready to be turned.
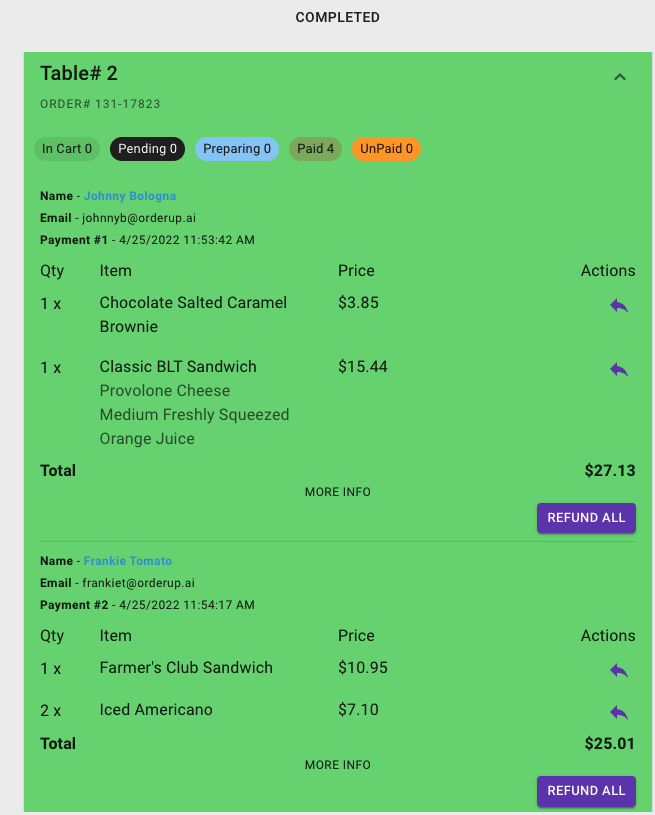
If those guests want to order more after, they'll have to start a new order.
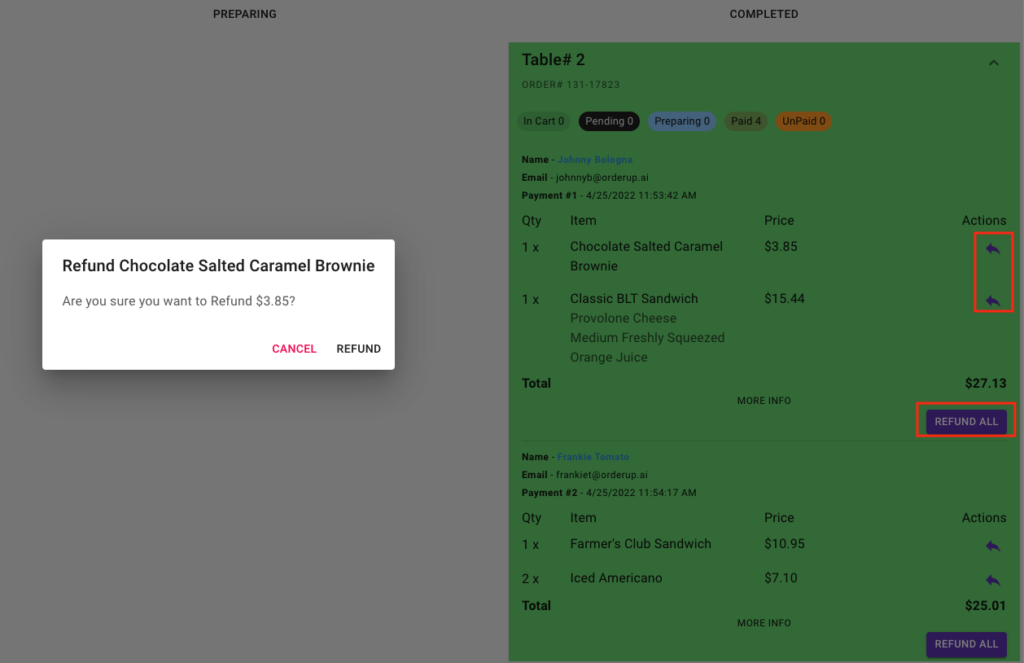
For Dine-In Orders, refunds can only be processed after a payment is complete.
To issue a refund:
Click the purple "back arrow" next to the item or click "Refund All".
Use the search bar at the top right of the order management screen:
- Guest Name
- Order Type
- Table Number
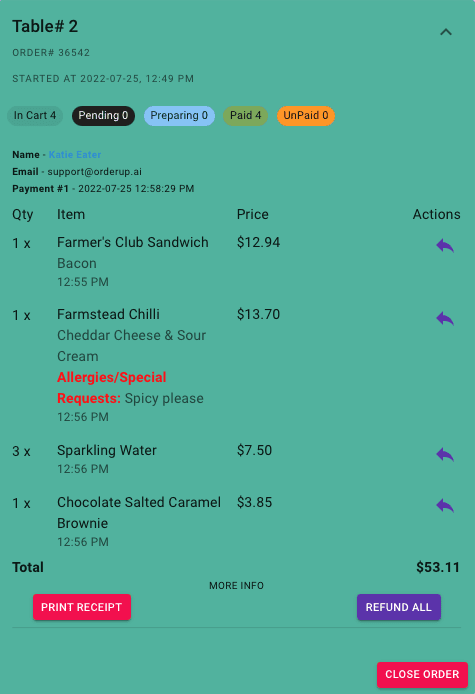
Once the order is paid for, click the red "Print Receipt" button on the ticket in the Completed column.
OR
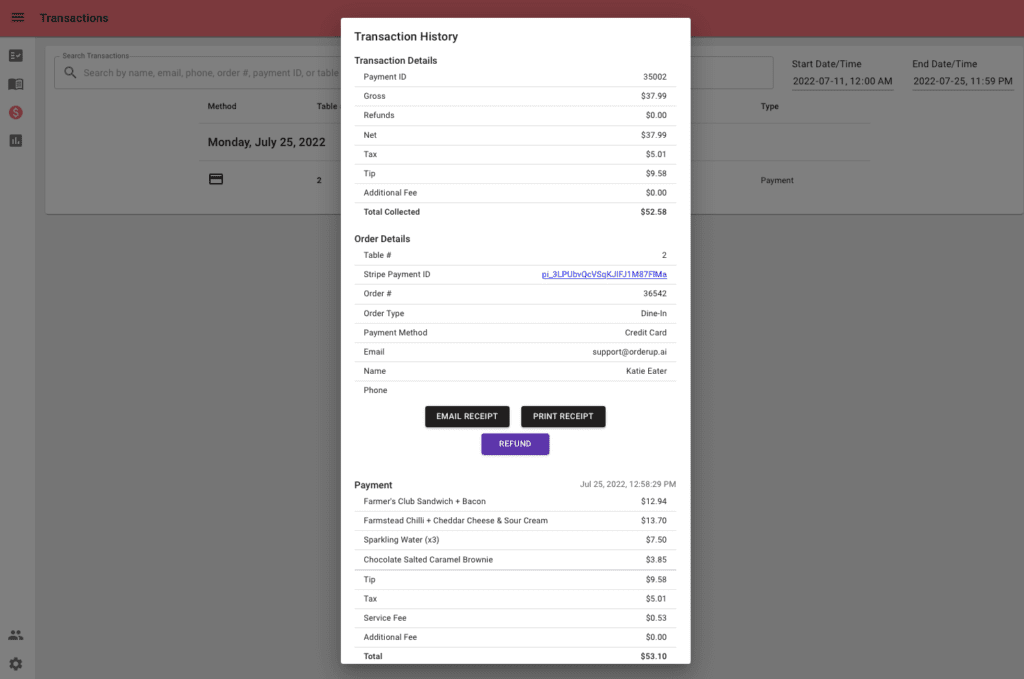
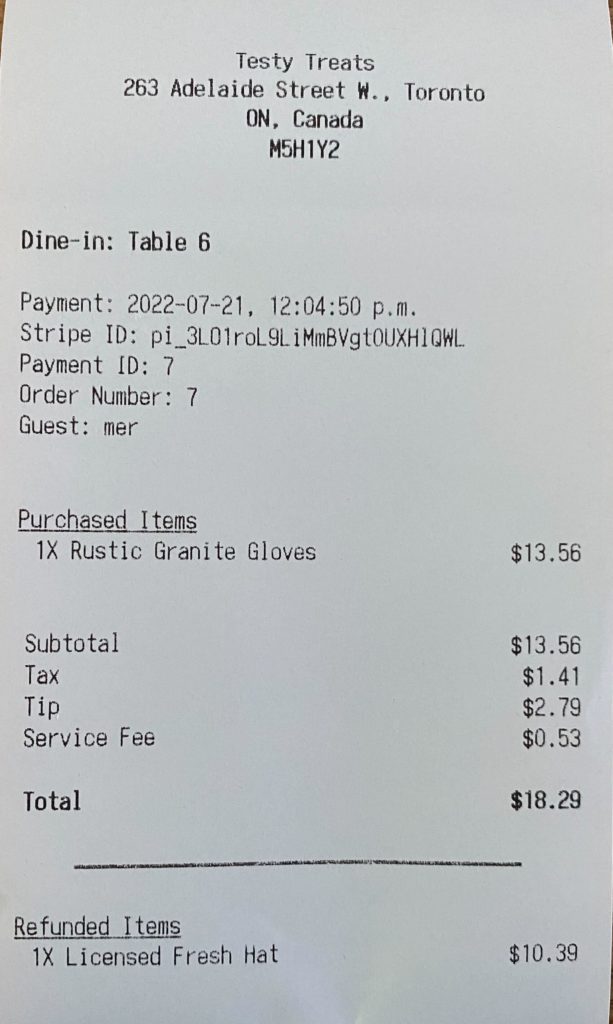
You can print a guest receipt from the "Transactions" page.
The receipt will print at whichever printer is connected to the device (Check Settings Tab). If necessary, you can include a guest receipt with any takeout orders.
MANAGING ORDERS – TAKEOUT
When a new order is placed, your merchant device will beep. Select "Confirm All Orders" on your Merchant Device and choose the appropriate preparation time.
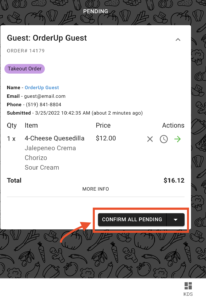
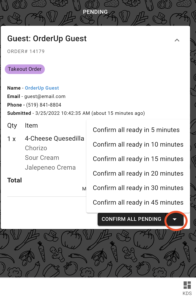
Next to the "Confirm All Pending" button, on your Merchant Device click the arrow to assign estimated ETA's.
Select your desired ETA.
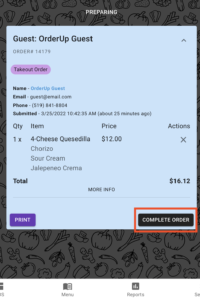
When the order is complete and ready to be picked up, click the "Complete Order" button in the Preparing (middle) column of the merchant order management device.
Each item will have an "X" to it's right. Click the "X" and select the reason for refunding.
Refunding Full Orders can only be done once the order is in the "Completed" column on the far right of your tablet or order management system. Click Refund All.
Use the search bar at the top of the merchant device to search for:
- Guest Name
- Order Type
- Email
When the order is picked up, click the "Close Order" button on the ticket.
The ticket will turn Grey, marking it as complete.
Once the order is paid for, click the red "Print Receipt" button on the ticket in the Completed column.
OR
You can print a guest receipt from the "Transactions" page.
The receipt will print at whichever printer is connected to the device (Check Settings Tab). If necessary, you can include a guest receipt with any takeout orders.


Menu Edits, Updates, Prices, Stock
- Navigate to the Menu tab on the left hand Navigation Bar.
- Along the Top, click the "Items Tab"
- Use the Search Bar to find the item.
- Mark it out of stock by using the toggle at the top right, or below the description.
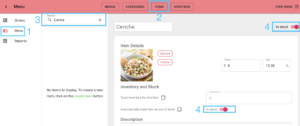
- Click the Menu tab on the left side navigation bar on the tablet. (second from top)
- Click the "item" tab in the top bar.
- Use the "Search Bar" to search for the item. Click it.
Edit the item's specific information.
Edit Orders
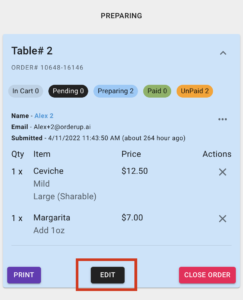
Orders can only be edited in the "Preparing" column (middle column).
Click the Edit button at the bottom of the order ticket.
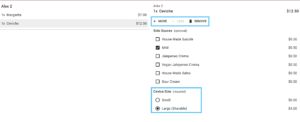
Once clicked, select the item you would like to edit.
You can:
- Add more of the same item
- Remove the item or a quantity of it
- Add Modifiers
- Remove Modifiers
- Change Size etc.
Reports, User & PIN Settings
CLICK HERE to learn how to:
Use the PIN Authorization feature to:
1) Reset your default admin PIN
2) Set user permissions
3) Access Sales Reports
4) Add new users & set permissions
- Navigate to the “Reports” (bar graph icon) Tab on the left hand navigation bar
- Enter your Authorization PIN
- Select your Date & Time range for the report
- Select the Menu from the Menu Filter (Select "Admin" for all)
- Click Generate Report
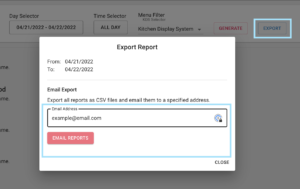
- Click Export to send a .CSV to your email
Once the report is generated, click EXPORT at the top right. Enter the email that you wish the report would be sent to.
To Print a Sales Report:
- Navigate to the settings page at the bottom of the left hand navigation bar.
- Scroll down to the "Generate Report" Section
- Select the Desired time and date frame.
- Click Generate Report and it will print at all printers connected.

Settings Page: Change ETA’s, Configure Printers
The Settings Page can be found on the botom left hand corner of the side toggle (Gear). See below:
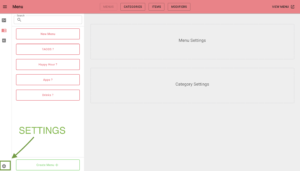
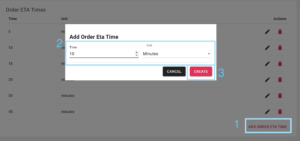
Add ETA's on the settings page. Scroll down to the "Eta" section and add or remove the desired timelines.
To change an ETA, click the "Pencil" icon to the right of the ETA.
To Add an ETA, click "Add Order ETA", enter the desired eta, click confirm.
Recover Session
Recover session is required when a guest
- Exits out of their menu completely
- Was using a private browser
What happens?
When they scan the QR code again, they will not be able to access their existing orders.
Use Session Code to allow the diner to access their order in progress.
Guests should receive a text message & email with a link to access the order:

When a guest can't access their order, and does not have the access link in their text messages or email (check spam), use a Recover Session Code" from the Order Management Interface (or tablet)
- Ask the guest for their name and table order.
- Go to the Order Management Interface tablet, and click the 3 dots towards the top right of the guests ticket.
- Click "Recover Session Code"
- This will display a QR Code for the guest to scan and access their order.


- On the Order Management System (tablet), search for the Table # in the top right corner of the order page
- Find that specific guests order in progress
- Click the Three Dots on next to their order on the right hand side (...)
- Click Get Session Code
Other Cases
Diners should not switch tables. All orders must be completed (paid for) before a guest switches tables or scans a new QR code.
If a guest is at Table #1, they should not scan the QR code at any other table until table #1 is completely paid for.
The diner should get a notification letting them know:

This guest will have to complete payment at their table before being able to order from a new table or QR code.
If they wish to continue ordering, note that the items will be delivered to the Original Table.
If a guest is not able to use a credit card or Visa-Debit card, and can only pay using Cash or debit only, you will need to use "Pay Cash External".
- Ask the guest for their name and table order.
- On the Order Management System (tablet), search for the Table # in the top right corner of the order page
- Find that specific guests order in progress
- Click the Three Dots on next to their order on the right hand side (...)
- Click "Pay Cash External"

7. An alert will pop up, confirming that this the bill will be paid for using Cash or Debit. Confirm if this is the case.
8. Cash out the guest using the POS & Payment terminal or Cash.

