When a new order is placed, your merchant device will beep. Select "Confirm All Orders" button on your Merchant Device.
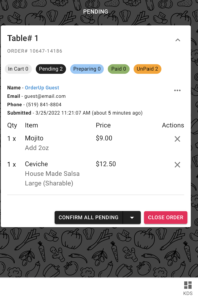
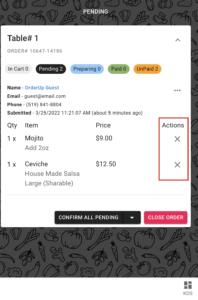
Reject an order or individual items by clicking the "X" next to the item.
The guest will be notified that the order can't be fulfilled.
An order is only complete once the guest or table has paid for the bill. Once fully paid, the order will move to the completed column.
Do not Close
Refunds can only be processed after payment is complete.
Refund an Item or modifier:
Click the purple arrow next to the item
Use the search bar at the top right of the order management screen:
- Guest Name
- Order Type
- Table Number
Items that are paid for will move to the "completed column" on the right hand side of the device.
If an order ticket is Grey it means the order has been paid for in full.
You can remove the order from the screen by pressing the "Archive Order Button"
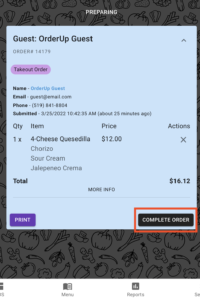
Once the order is fully paid for, click the purple "Print" button. This will print at whichever printer is connected to the device (Check Settings Tab). If necessary, you can put the receipt with the takeout order.
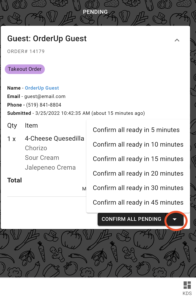
When a new order is placed, your merchant device will beep. Select "Confirm All Orders" on your Merchant Device and choose the appropriate preparation time.
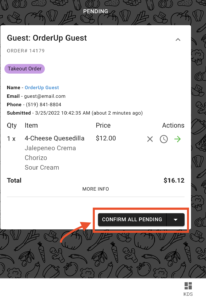
Next to the "Confirm All Pending" button, on your Merchant Device click the arrow to assign estimated ETA's.
Select your desired ETA.
When the order is complete and ready to be picked up, click the "Complete Order" button in the Preparing (middle) column of the merchant order management device.
Each item will have an "X" to it's right. Click the "X" and select the reason for refunding.
Refunding Full Orders can only be done once the order is in the "Completed" column on the far right of your tablet or order management system. Click Refund All.
Use the search bar at the top of the merchant device to search for:
- Guest Name
- Order Type
- Email
When the order is picked up, click the "Close Order" button on the ticket.
The ticket will turn Grey, marking it as complete.
Once the order is fully paid for, click the purple "Print" button. This will print at whichever printer is connected to the device (Check Settings Tab)
- Navigate to the Menu tab on the left hand Navigation Bar.
- Along the Top, click the "Items Tab"
- Use the Search Bar to find the item.
- Mark it out of stock by using the toggle at the top right, or below the description.
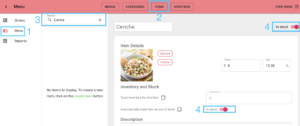
- Click the Menu tab on the left side navigation bar on the tablet. (second from top)
- Click the "item" tab in the top bar.
- Use the "Search Bar" to search for the item. Click it.
Edit the item's specific information.
Orders can only be edited in the "Preparing" column (middle column).
Click the Edit button at the bottom of the order ticket.
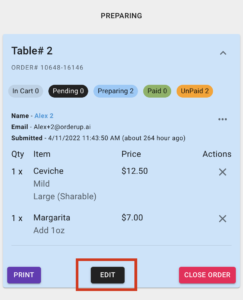
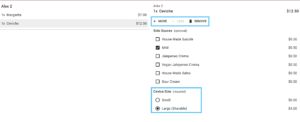
Once clicked, select the item you would like to edit.
You can:
- Add more of the same item
- Remove the item or a quantity of it
- Add Modifiers
- Remove Modifiers
- Change Size etc.
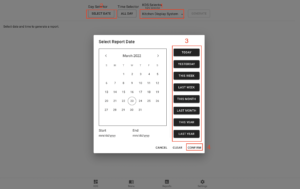
- Navigate to the “Reports” Tab on the left hand navigation bar
- Select the KDS or Order Management System in the dropdown
- Click Select Date or Time Selector
- Choose your desired date range
- Click Confirm
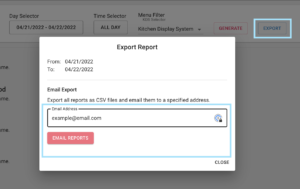
Once the report is generated, click EXPORT at the top right. Enter the email that you wish the report would be sent to.
Once the report is generated, click EXPORT at the top right. Enter the email that you wish the report would be sent to.
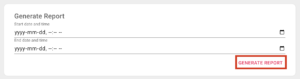
To Print a Sales Report:
- Navigate to the settings page at the bottom of the left hand navigation bar.
- Scroll down to the "Generate Report" Section
- Select the Desired time and date frame.
- Click Generate Report and it will print at all printers connected.
The Settings Page can be found on the botom left hand corner of the side toggle (Gear). See below:

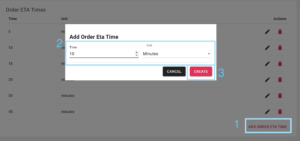
Add ETA's on the settings page. Scroll down to the "Eta" section and add or remove the desired timelines.
To change an ETA, click the "Pencil" icon to the right of the ETA.
To Add an ETA, click "Add Order ETA", enter the desired eta, click confirm.
Recover session may be required if a guest
- Exits out of their menu completely
- Was using a private browser and relaunch their session
- A menu session is broken
- Scanning the QR code another time doesn't bring up the session
What happens?
When they scan the QR code again, they will not be able to access their existing orders.
TROUBLESHOOTING STEP 1:
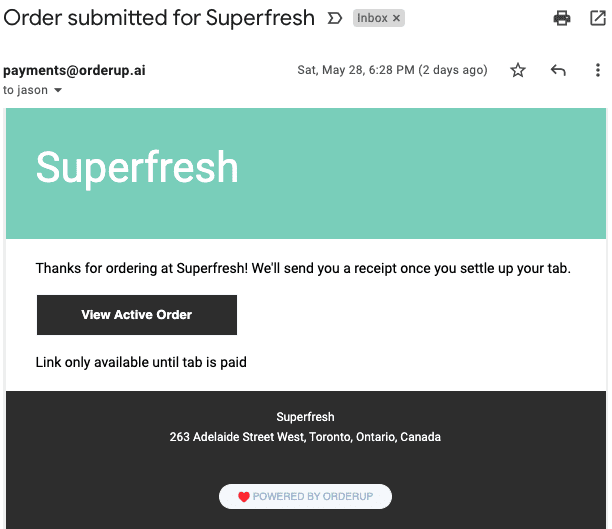
- Have guest go to their email
- Have them check their email for the Resume Active Order Link.
- The email comes from [email protected] > sometimes it will go to Spam or the Promotions tab in an email account
TROUBLESHOOTING STEP 2:
- Use Session Code to allow the diner to access their order in progress. [see next section for instructions]
When a guest can't access their order,
- Ask the guest for their name and table order.
- On the Order Management System (tablet), search for the Table # in the top right corner of the order page
- Find that specific guests order in progress
- Click the Three Dots on next to their order on the right hand side (...)
- Click Get Session Code
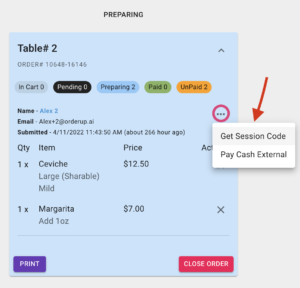
7. Write down or take a picture of the session code, and tell the guest.